Acer File Extensions |
Acer 6100 Motherboard
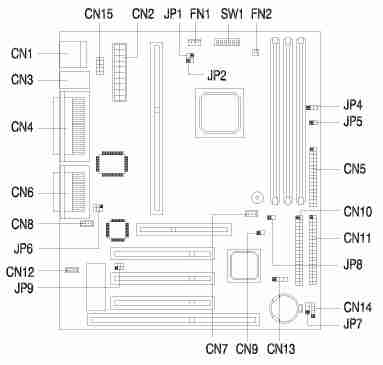
Jumper and Connector Layout
Jumper Settings
| Jumper | Setting | Function |
|---|---|---|
| JP6 - Audio Port Function | 1-3, 2-4 3-5, 4-6 * | Line-out Speaker-out |
| SW1-5 - Password | On * Off | Bypass password Check password |
| SW1-6 | Reserved |
| SW1 Settings | |||||
|---|---|---|---|---|---|
| Ratio | 1 | 2 | 3 | 4 | |
| 2 | On | On | On | On | |
| 3 | On | On | Off | On | |
| 4 | On | On | On | Off | |
| 5 | On | On | Off | Off | |
| 2.5 | On | Off | On | On | |
| 3.5 | On | Off | Off | On | |
| 4.5 | On | Off | On | Off | |
| 5.5 | On | Off | Off | Off | |
| 6 | Off | On | On | On | |
| 7 | Off | On | Off | On | |
| 8 | Off | On | On | Off | |
| 6.5 | Off | Off | On | On | |
| 7.5 | Off | Off | Off | On | |
| 1.5 | Off | Off | Off | Off | |
Connector Functions
| Connector | Function |
|---|---|
| CN1 | USB ports |
| CN2 | ATX power connector |
| CN3 | Upper: PS/2 mouse port Lower: PS/2 keyboard port |
| CN4 | Upper: Parallel port Lower: COM1 port (left), COM2 port (right) |
| CN5 | Floppy disk drive connector |
| CN6 | Upper: Game/MIDI port Lower: (L-to-R) Stereo line-out/speaker-out port, Stereo line-in port, Mono microphone-in port |
| CN7 | Wake-on-LAN connector |
| CN8 | CD-in connector |
| CN9 | Power switch connector |
| CN10 | IDE2 connector |
| CN11 | IDE1 connector |
| CN12 | Fax/modem connector |
| CN13 | Modem ring-in connector |
| CN14 | Hard disk drive LED connector |
| CN15 | USB daughter board connector |
| FN1 | Fan alarm connector |
| FN2 | 2-pin fan connector |
| JP1 | System temperature detector connector |
| JP2 | Processor temperature detector connector |
| JP4 | Turbo LED connector (pins 2-3) |
| JP5 | Reset switch connector |
| JP7 | Power/Suspend LED connector |
Memory Upgrade
The system memory is upgradable to a maximum of 384M via three 168-pin DIMM sockets on board. These DIMM sockets accept 8-, 16-, 32-, 64-, and 128MB PC100 3.3V SDRAM DIMMs.
BIOS
How do I enter the BIOS Setup Utility?
You can access the BIOS Setup Utility by pressing CTRL+ALT+ESC as the system is booting. At the bottom of the second start up screen you should see "To enter setup, press CTRL_ALT_ESC".
Note: If the system displays the Acer Splash Screen, once you hear the beep, you should begin pressing CTRL+ALT+ESC. You may need to press CTRL+ALT+ESC continuously until you access the BIOS setup screen.
How do I set a password on my Aspire 6100?
The Setup program has a number of security features to prevent unauthorized access to the system and its data. The Setup Password prevents unauthorized access to the BIOS utility.
- Make sure that switch 5 of SW1 is set to On (bypass password).
Note: You cannot enter the BIOS utility if a Setup password does not exist and switch 5 of SW1 is set to Off (password check enabled). By default, switch 5 of SW1 is set to On (bypass password).
- Press Ctrl+Alt+Esc to enter the BIOS Utility Setup and select System Security
- Highlight the Setup Password parameter and press either the left or right arrow. The Setup Password screen appears:
- Type a password. The password may consist of up to seven characters. Then press Enter.
Note: Be very careful when typing your password because the characters do not appear on the screen.
- Retype the password then press Enter.
- After setting the password, highlight the, Set or Change Password option.
- Press Esc to return to the System Security screen.
- Press Esc to return to the main menu.
- Press Esc to exit the BIOS utility. A dialog box appears asking if you want to save the CMOS data.
- Select Yes to save the changes and reboot the system.
- After rebooting, turn off the system then open the housing.
- Set switch 5 of SW1 to Off to enable the password function.
- The next time you want to enter the BIOS utility, you must key-in your Setup password.
Changing/Removing the Setup Password
Should you want to change your setup password, do the following:
- Enter the BIOS utility and select System Security.
- Highlight the Setup Password parameter and press the left or right arrow. The Setup Password menu appears.
- From the Setup Password menu, highlight the Set or Change Password option.
- Enter a new password.
- Press Esc to return to the System Security screen.
- Press Esc to return to the main menu.
- Press Esc to exit the BIOS utility. A dialog box appears asking if you want to save the CMOS data.
- Select Yes to save the changes.
Note: To remove the password, simply select the Setup Password parameter from the System Security menu and set it to None.
Bypassing the Setup Password
If you forget your setup password, you can bypass the password security feature by hardware. Follow these steps to bypass the password:
- Turn off and unplug the system.
- Open the system housing and set switch 5 of SW1 to On to bypass the password function.
- Turn on the system and enter the BIOS utility. This time, the system does not require you to type in a password.
Note: You can either change the existing Setup password or remove it by selecting None. Refer to the previous section for the procedure.
Power-on Password
The Power-on Password secures your system against unauthorized use. Once this password is set, it will be necessary to type it whenever you boot the system. To set this password,
- Enter the BIOS utility, select System Security,
- Highlight the Power-on Password parameter.
- Follow the same procedure as in setting the Setup password.
Note: Make sure switch 5 of SW1 is set to Off to enable the Power-on password.
Operation Mode
This function lets you enable or disable the password prompt display. When set to Normal, the password prompt appears before system boot. When set to Keyboard Lock, the password prompt does not appear; however, your system will not respond to any keyboard or mouse input until you enter the correct password. The default setting is Normal.