Acer File Extensions |
Acer V50LA-N Motherboard
Jumper and Connector Layout
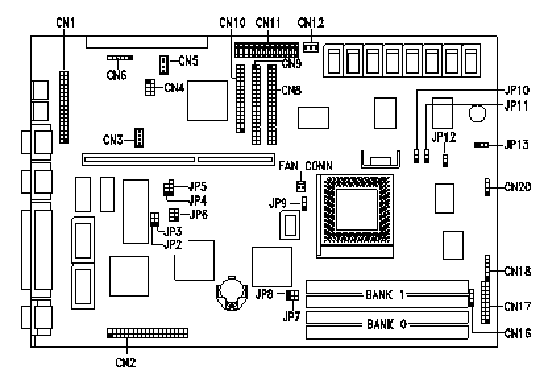
Note - The blackened pin of a jumper represents pin 1.
- CPU Socket: ZIF Socket 7
- CPU Types:
- Intel Pentium 75
- Intel Pentium 90
- Intel Pentium 100
- Intel Pentium 120
- Intel Pentium 133
- Intel Pentium 150
- Intel Pentium 166
- Clockspeeds:
- 50 MHz (Pentium 75 MHz)
- 60 MHz (Pentium 90/120/150 MHz)
- 66 MHz (Pentium 100/133/166 MHz)
- On-Board Memory:
- 0 MB RAM
- 0 KB or 256 KB Cache
- 1 MB Video DRAM (Upgradeable to 2 MB)
- On-Board Video: ATI Mach64(CT)
- BIOS Type: Flash
- Bus Type: ISA/PCI
- On-Board Controller: SMC
- Chipset: ALI
- I/O Ports:
- 2 9-pin Serial
- 1 25-pin Parallel (ECP/EPP)
- Cases: Jetson Desktop or Jetson Mini-Tower
More Information
- Cache Upgrade
- Cache Sockets: 9
- Supported Sizes: 256KB
- Cache Type: Asynchronous
- The cache sockets are located at U40, U41, U43, U44, U45, U47, U50, U51, and U36.
- Ensure that jumpers JP7 & JP8 are set to 1-2 for 256KB.
- Memory Upgrade
- SIMM Sockets: 4 x 72-pin Sockets - 2 Banks
- Maximum RAM: 128 MB
- SIMM Type: 72-pin 70ns Non-Parity
- Video Upgrade
- Video DRAM Sockets: 2 (U5, U6)
- Supported Sizes: 1 MB (onboard), (upgradeable to 2 MB)
- Video DRAM Type: 256 KB x 16 70ns
- Upgrade using 2 of 514260ASL 256Kb x 16 70ns SOJ inserted into sockets U3 & U4.
CPU configurations
| CPU Type | JP6 | JP9 | JP10 | JP 11 |
|---|---|---|---|---|
| Intel P75 | 1-4 | 1-2 | 1-2 | 1-2 |
| Intel P90 | 2-5 | 1-2 | 1-2 | 1-2 |
| Intel P100 | 3-6 | 1-2 | 1-2 | 1-2 |
| Intel P120 | 2-5 | 1-2 | 1-2 | 2-3 |
| Intel P133 | 3-6 | 1-2 | 1-2 | 2-3 |
| Intel P150 | 2-5 | 1-2 | 2-3 | 2-3 |
| Intel P166 | 3-6 | 1-2 | 2-3 | 2-3 |
| Cyrix P120+ | 1-4 | 2-3 | 1-2 | 2-3 |
| Cyrix P150+ | 2-5 | 2-3 | 1-2 | 2-3 |
N.B. Cyrix/IBM CPU names suggest their performance compared to Intel Pentiums and are higher than their clock speeds.
Jumper Settings
| Jumper | Setting | Function | |||||||||||||||
|---|---|---|---|---|---|---|---|---|---|---|---|---|---|---|---|---|---|
| JP2 BIOS Type | 1-2 2-3* | For models with Acer BIOS For models with OEM BIOS | |||||||||||||||
| JP3 Password Check | 1-2 2-3* | Check password Bypass password | |||||||||||||||
| JP4 Boot Block Feature ** | 1-2 2-3* | Enable Flash ROM boot block feature Disable Flash ROM boot block Feature | |||||||||||||||
| JP5 BIOS ROM Type | 1-2 2-3 3-4* | Reserved Flash ROM (Intel 28F001)Flash ROM (SST, Winbond 29EE010) | |||||||||||||||
| JP6 CPU Core/Host Bus Frequency | 1-4 2-5* 3-6 | 75/50 MHz 90/60, 120/60, 150/60 MHz 100/66, 133/66, 167/66 MHz | |||||||||||||||
| JP7,JP8 Second-level Cache | 1-2*,1-2* 1-2, 2-3 2-3, 2-3 | 256 KB 512 KB 1 MB | |||||||||||||||
| JP9 CPU Type | 1-2* 2-3 | Intel P54C or AMD K5 Cyrix M1 | |||||||||||||||
| JP10,JP11 CPU / Clock Ratio |
|
| |||||||||||||||
| JP12 CPU Voltage | 1-2* 2-3 | 3.38V for VR and standard CPU type 3.52V for VRE CPU type |
** The boot block feature works only with Intel 28F001 Flash ROM and requires JP5 to be set to pins 2-3.
*Default setting.
Connector Functions
| Connector | Function |
|---|---|
| CN2 | ATI media connector 264 CT (26-pin VFC 5V) 264 VT (40-pin AMC 3.3V) Note: 264 CT and 264 VT are not interchangeable because they have different supply voltages. |
| CN8 | IDE channel 1 |
| CN9 | IDE channel 2 |
| CN10 | Diskette drive connector |
| CN11 | Power connector |
| CN12 | Reserved |
| CN16 | SMM switch/Reset switch 1-2* For SMM switch 2-3 For reset switch 3-4 Reserved |
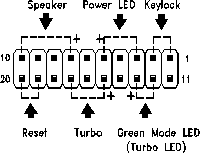
| CN17 | Multifunction connector |
| CN20 | Hard disk drive LED connector |
| The multifunction connector CN17 accommodates the front panel connectors for speaker, LEDs, keylock, reset, and turbo. Figure 1-3 shows the CN17 pin assignments for each of the front panel connectors. |
BIOS
Entering the BIOS
Pressing CTRL-ALT-ESC during the boot process is the only way to enter the BIOS. Pressing the sequence at the MS-DOS prompt will do nothing.
- Turn on the system and wait until a beep is heard.
- Press CTRL-ALT-ESC to enter the BIOS.
Viewing the BIOS Revision and Memory Count
To review the BIOS Revision and memory count without having to disable Quiet Boot, follow the steps below.
- Turn on the system and wait until a beep is heard.
- Press F9 and the normal post screen will appear.
There are two new features found in Basic System Configuration page two.
- Quiet Boot
- Default is enabled, only a flashing Acer Logo screen will appear until Windows 95 starts to load. When this is disabled, the system will display the normal BIOS revision and memory count during the boot process.
- Configuration Table
- Default is disabled, toggling this option will allow one to view the blue post screen: CPU, hard drives, floppy drives, memory, serial ports, parallel ports, and pointing device status are displayed here.