Acer File Extensions |
Advent 5302 Laptop
Specification
| CPU | Intel Core 2 Duo T5550 (1.83GHz) |
| BIOS | Phoenix BIOS. Press F2 to enter |
| Chipset | SiS M672MX |
| Memory | 2GB DDR2 PC2-5300 (1 Memory Slot. Max 2GB) |
| Hard Drive | 250GB Western Digital WD2500BEVS-22UST0 |
| CD Drive | TSSTcorp CDDVDW TS-L632H *** |
| Screen | 15.4" Widescreen TFT (1280x800) |
| Video Card | SIS Mirage3 integrated graphics (256MB shared) |
| Sound Card | Realtek High Definition Audio |
| Network Card | SiS191 Ethernet Controller LiteOn WN6301L (RTL8187B) Wireless LAN * |
| Ports ** | 4x USB 2.0 1x Headphone 1x Microphone 1x 4-in-1 Card Reader 1x Kensington Lock 1x LAN 1x VGA |
| Battery | U40-4S2200-C1L3 (14.4v 2200mAh) U40-4S2200-G1L3 (14.4v 2200mAh) U40-4S2200-C1M1 (14.8v 2200mAh) U40-4S2200-G1B1 (14.8v 2200mAh) U40-4S2200-S1B1 (14.8v 2200mAh) |
| Dimensions | 34.65 x 255.5 x 358 (HxWxD in mm) |
| Weight | 2.9kg |
| Colour | Black |
| Made By | Uniwill U50SI2 |
* The wireless is enabled on this laptop by pressing the function (Fn) key and F10 key at the same time. Note that the wireless needs to be turned on every time the computer is restarted.
** While the case does have a modem port it should be blocked off as the 5302 doesn't have a 56k modem fitted.
*** May have an Optiarc DVDRW AD-7530B drive fitted instead.
Drivers
Your laptop should have been supplied with a Utility CD which contains a copy of the user manual and all the drivers.
Memory Upgrades
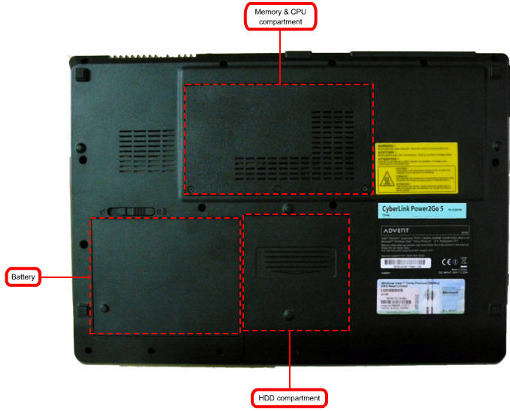
There is a bit of confusion regarding the memory on this laptop. According to Advent the laptop has two memory slots but all other sources point to it only having one. The one confirmed slot is accessed by removing the expansion panel underneath the laptop (see "Bottom of Laptop" section below).
Bottom of Laptop
Function Keys
Fn+F1 - Put the laptop into Suspend Mode
Fn+F2 - Enter Silent Mode
Fn+F3 - Mute/UnMute Sound
Fn+F4 - Change display mode - Laptop Screen/ External display/ Laptop and External display
Fn+F5 - Increase the speaker volume
Fn+F6 - Decrease speaker volume
Fn+F7 - Increase brightness
Fn+F8 - Decrease brightness
Fn+F9 - Enable/ Disable touchpad
Fn+F10 - Enable/ Disable Wireless
In the Box
Disks Supplied
- Microsoft Works 8.5
- Notebook Utility CD (includes drivers and user manual)
Items Supplied
- Advent 5302 notebook
- Li Shin power supply. Output: 20V - 3.25A
- Mains power cable
Documentation Supplied
- Windows Vista Quick Start Guide booklet
- Advent Windows Vista user guide
- Integrated Webcam addendum
- Advent Recovery guide
- Advent Safety guide
Recovery Disc
Hard Drive Recovery
Should your Windows develop serious errors or fail to start, you can restore your computer back to factory settings by using the hard drive recovery located on a hidden partition on the hard drive.
To restore your computer back to factory settings, follow the steps below:
- Turn on the computer and keep tapping F8 until the advanced options menu is displayed
- Use the up/down arrow keys on the keyboard to highlight Repair Your Computer and press enter to select it
- Select the language you wish to install (normally English is the only option)
- Once you have chosen your language you will be presented with the available recovery options
- Microsoft Repair Environment - after choosing the UK keyboard layout you will be asked to choose the Operating System you wish to repair. If Windows Vista is not listed then you cannot repair the OS without doing the full recovery. After choosing Vista the Microsoft Vista startup repair tool will run and attempt to repair any startup problems you are experiencing
- Reinstall Windows - gives you the options available to reinstall Vista
- Advanced Options - this launches the diagnostic centre allowing you to run chkdsk, launch notepad or bring up a command prompt
- Exit & restart computer - Exits withut running the recovery process
- To continue with the recovery program you need to choose Reinstall Windows
- On the next screen you have the ability to launch Vista System Restore and roll back to a date when Vista was last working ok or to run the Full Destructive Recovery. To continue with the recovery program you need to choose Start Full Destructive Recovery
- After choosing the Full Destructive Recovery option you are presented with the warning screen that all data will be lost. It is important to make sure all data has been backed up to disk if possible and to realise this process deletes all data and reverts the machine back to it's default state. To continue with the recovery program you need to tick the box indicating you are aware of data loss
- The recovery process will then run through, the computer will restart a couple of times during this. You will also need to go through the Vista "Out of Box Experience", to configure Vista. This is fairly straightforward so just follow the onscreen instructions
Recovery DVD Creator
Your computer comes supplied with a hard drive based recovery allowing you to reinstall Windows Vista very easily should the need arise. You also have the ability to create a recovery DVD which is recommended on all machines. To create a recovery DVD (note - you cannot use CDs) do the following.
- Double click on the Techguys DVD icon on the desktop or from the start menu
- The first screen will prompt you to insert a DVD into your drive. Click OK.
- On the next screen make sure your DVD drive is selected in the 'To' field. To reduce the risk of errors ensure the write speed is set to the lowest value and tick verify recorded data. Click Burn
- Once the process has completed, label your DVD, keep it in a safe place and in a protective case to avoid damage
DVD Recovery
Should your Windows develop serious errors or fail to start, you can restore your computer back to factory settings by using the Recovery DVD you may have created or been sent.
To restore your computer back to factory settings, follow the steps below.
- Start the computer with the Recovery DVD in the optical disc drive
- After the usual startup screen has vanished press a key when prompted to load from the DVD
- Select the language you wish to install (normally English is the only option)
- Once you have chosen your language you will be presented with the available recovery options
- Microsoft Repair Environment - after choosing the UK keyboard layout you will be asked to choose the Operating System you wish to repair. If Windows Vista is not listed then you cannot repair the OS without doing the full recovery. After choosing Vista the Microsoft Vista startup repair tool will run and attempt to repair any startup problems you are experiencing
- Reinstall Windows - gives you the options available to reinstall Vista
- Advanced Options - this launches the diagnostic centre allowing you to run chkdsk, launch notepad or bring up a command prompt
- Exit & restart computer - Exits withut running the recovery process
- To continue with the recovery program you need to choose Reinstall Windows
- On the next screen you have the ability to launch Vista System Restore and roll back to a date when Vista was last working ok or to run the Full Destructive Recovery. To continue with the recovery program you need to choose Start Full Destructive Recovery
- After choosing the Full Destructive Recovery option you are presented with the warning screen that all data will be lost. It is important to make sure all data has been backed up to disk if possible and to realise this process deletes all data and reverts the machine back to it's default state. To continue with the recovery program you need to tick the box indicating you are aware of data loss
- The recovery process will then run through, reinstalling Vista and also recreating the hard drive recovery system for future use.
- When it has finished copying files it will ask you to remove the DVD and then restart the computer. It will then go through setting up Vista, you will need to go through the Vista "Out of Box Experience". This is fairly straightforward so just follow the onscreen instructions