Acer File Extensions |
Advent 6410 Laptop
Specification
| CPU | Intel Pentium III 1.0 GHz |
| Memory | 128MB PC133 SODIMM (2 memory slots. Max 256MB) |
| Hard Drive | 20GB Fujitsu MHT2020AT |
| CD Drive | 8X Toshiba SD-C2502 DVD-ROM |
| Floppy Drive | Floppy disk drive fitted |
| Screen | 14.1" TFT (Native Res.1024x768) |
| Video Card | Trident Blade 3D 8MB |
| Sound Card | VIA AC97 PCI audio (WDM) |
| PC Card | Will take either 2x Type I/II or 1x Type III |
| Modem | LT Winmodem V.90 56K |
| Ports | 2x USB 2x PCMCIA 1x Modem/LAN 1x Kensington Lock 1x PS/2 1x Serial 1x Parallel 1x VGA 1x S-Video (TV Out) 1x Microphone 1x Audio In 1x Headphone |
| Battery | A44 (14.4v 3200mAh) |
| Made By | Gericom A440 Series |
Drivers
Your laptop should have been supplied with a utility CD which contains a backup copy of all the drivers.
Memory Upgrades
This laptop has two memory slots. To access the memory compartment -
- Make sure the computer is switched off and everything unplugged
- Turn the laptop upside down and remove the screw holding the memory compartment cover (see "Bottom of Laptop" section below)
- Removing the cover will give you access to the memory compartment which contains both memory slots.
Bottom of Laptop
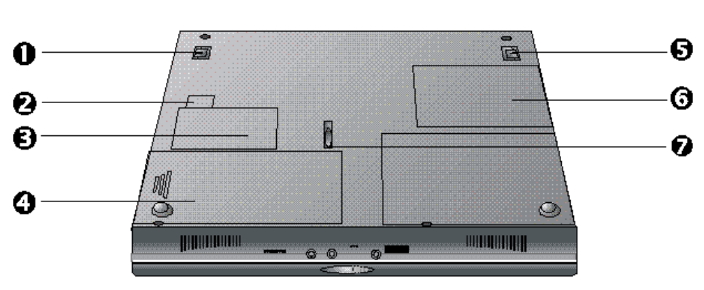
- Tilt Support
- Modem/LAN Bay
- Modem/LAN Card Compartment
- Battery
- Tilt Support
- Memory Compartment
- Battery Lock
Function Keys
Fn+F3 - Toggle the display between LCD, CRT, and LCD+CRT
Fn+F4 - Toggle between suspend/resume state
Fn+F6 - Turn audio on/off
Fn+F8 - Increase screen brightness
Fn+F9 - Decrease screen brightness
Fn+F10 - Increase screen contrast (DSTN screens only)
Fn+F11 - Decrease screen contrast (DSTN screens only)
In the Box
Disks Supplied
- Recovery CD
- Utility and drivers CD
Items Supplied
- Advent 6410 notebook
- Mains power adapter
- Mains power cable
- UK modem cable
- S-Video cable
Documentation Supplied
- Advent notebook user's manual
- Gettings started with Microsoft Windows Me
- Freeserve leaflet
- User guide for fax modem
Recovery
Warning: this process will erase all files from your computer. It is important that you save any personal files to disk before you begin.
A bootable recovery CD is supplied with these machines. To recover the system:-
- Insert CD (and floppy disk if supplied) into the drive.
- Reboot the PC.
- A warning message prompting you to backup data before proceeding.
- Press Y to continue.
- A final warning that all data will be erased is displayed.
- Press Y to continue.
- Finally a message "Remove CD-ROM when prompted" is displayed.
- Press Y to continue.
- The image file will load. Once complete you will be prompted to remove the CD and press CTRL + ALT + DEL to restart.
Driver CD
The notebook is supplied with a Utility CD. This can be used to restore corrupt drivers.
FAQ
Blank screen or EMM386 error after recovery
Once the recovery has completed the screen goes blank or an EMM386 error message is dispalayed. This happens because the laptop is having problems displaying the message to remove the CD and restart. Simply remove the CD from the drive and restart the laptop, first time setup will begin as normal.