Acer File Extensions |
Advent 7026 Laptop
Specification
| CPU | Intel Pentium 4 2.66 GHz |
| BIOS | AMIBIOS. Press DEL to enter |
| Memory | 512MB PC2100 DDR SODIMM (2 memory slots. Max 1GB) |
| Hard Drive | 40 GB Toshiba MK4012GAS |
| CD Drive | Matshita UJ-815 DVD-RW Drive |
| Screen | 15" TFT (Native Res.1024 x 768) |
| Video Card | ATI Mobility Radeon 9000 64MB |
| Sound Card | SiS 7012 |
| Modem | SmartLink 56K |
| Network Card | SiS 900 Broadcom WL-352BW Wireless LAN |
| PC Card | 1x Type I/II |
| Ports | 1x Microphone 1x Headphone 1x PS/2 1x IR 1x S-Video (TV-Out) 1x Modem 1x LAN 1x IEEE1394 (FireWire) 1x PC Card (Type I/II) 1x VGA 1x Parallel 2x USB 2.0 1x Kensington Lock |
| Battery | UN251S1(C1)-E1 (11.1v 6000mAh) |
| Dimensions | 45 x 326 x 280 (HxWxD in mm) |
| Weight | 3.3kg |
| Made By | Gericom N251S6 Series |
Drivers
Your laptop should have a backup copy of all the drivers, you can find it by browsing to the c:\applications\drivers folder. If this folder is missing then your laptop should also have been supplied with a utility CD which contains a copy of the drivers.
Memory Upgrades
This laptop has two memory slots which are accessed by removing the threee screws from the memory module cover underneath the laptop.

Bottom of Laptop
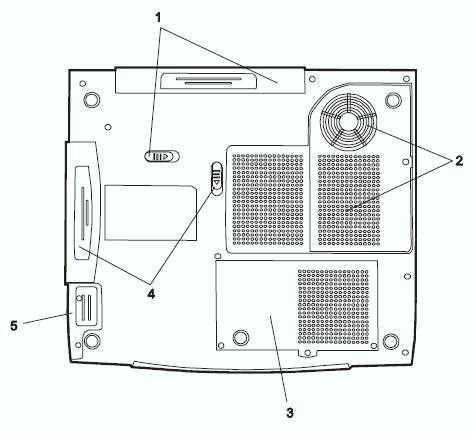
- Battery Pack and Battery Latch
- Ventilation Grill
- Memory Expansion Socket and Mini PCI Socket Access Door
- Swappable Device Bay and Latch
- Hard Disk Drive Bay
Function Keys
Fn + F1 - Activates suspend mode
Fn + F3 - Turns battery warning beep on or off
Fn + F4 - Changes between display mode: LCD only, CRT only, LCD and CRT
Fn + F5 - Increases speaker volume
Fn + F6 - Decrease speaker volume
Fn + F7 - Increase display brightness
Fn + F8 - Decrease display brightness
In the Box
Disks Supplied
- Advent system recovery CD version 2.1
- Utility CD version 1.1
- PowerDVD XP 4.0 (CD key printed on the CD sleeve)
- Nero Express (CD key printed on CD sleeve)
- Microsoft Works 7.0 CD
Items Supplied
- Advent 7026 notebook
- Mains power adapter
- Mains power cable
- UK modem cable
- BT phone connector
Documentation Supplied
- Advent notebook installation manual and troubleshooting guide
- Microsoft Windows XP Home Edition "Start here" guide
- Freeserve leaflet
Recovery Disc
Due to the nature of the recovery process you should not use FDISK or any other partition management software to delete the partition on your Advent computer. Doing so will prevent the recovery from functioning correctly. If the recovery asks for a second CD you will need to obtain an Update CD from Advent.
To recover your Advent PC you will need your Advent System Recovery CD.
- Place the CD into the DVD drive and restart your computer.
- Press R on the keyboard when prompted.
- The recovery will load and display a menu of options:
- Non-destructive recovery: This option will restore Windows, supplied applications, and drivers. This option will not destroy your documents or programs. These will be backed up along with the registry. These are restored at the end of the recovery process.
- System Recovery - No format: This will reinstall Windows, supplied applications and drivers. It will move your files to a folder called "My old disk structure". Any applications (except those supplied) will need to be reinstalled.
- System Recovery - Quick format: This option will erase your hard drive including your personal files. Windows, supplied applications and drivers will be reinstalled.
- Select the Non-destructive recovery option and press Next.
- You will be informed about System Restore in Windows, click Yes.
- The recovery will begin. Once this is complete you should eject the CD and click Restart.
Additional information.
Press the ALT and D keys at the recovery menu to access a command prompt. This will allow access to C: drive. The command prompt will default to E:\i386\system32 where you can run a variety of tools including CHKDSK.EXE.
Reinstalling applications
From version 2.x of the recovery system onwards you can install applications from the c:\applications folder. Drivers can be installed from the c:\applications\drivers folder and utilities from the c:\applications\tools folder. You will still need to install Microsoft Works from the supplied CD.
FAQ
Problems Installing Windows XP SP2
This is probably a bit late for most people but there is a good article on getting SP2 working on these laptops - https://www.pcreview.co.uk/threads/sp2-boot-failure-system-freeze-agpcpq-sys-agp440-sys-lock-ups.418131/#post-14012293