Acer File Extensions |
Advent 7077 Laptop
Specification
| CPU | Intel Pentium 4 550 Prescott (3.4 Ghz) |
| BIOS | AMI BIOS. Press DEL to enter |
| Chipset | SiS 661 |
| Memory | 512MB DDR-266/333/400 SODIMM (1 memory slot. Max 1GB) |
| Hard Drive | 80GB |
| CD Drive | DVD+/-RW |
| Screen | 15" TFT (native resolution 1024x768) |
| Video Card | SiS M661FX (64MB shared) |
| Sound Card | Realtek AC'97 |
| Modem | Agere Systems AC'97 |
| Network Card | SiS 900 integrated fast ethernet Ralink RT2500 series Wireless LAN Card |
| PC Card | 1x Type I/II |
| Ports | 1x LAN 1x IR 1x IEEE1394 (FireWire) 1x Modem 2x USB 2.0 1x Kensington Lock 1x Microphone 1x Headphone 1x Parallel 1x VGA 1x S-Video (TV-Out) 1x PC Card Slot |
| Touchpad | Synaptics Touchpad |
| Power Supply | Lite-On PA-1121-02 |
| Battery | EM-G730L3 (14.8v 6600mAh) |
| Dimensions | 50 x 332 x 284 (HxWxD in mm) |
| Weight | 3.8kg |
| Colour | Silver/Black |
| Made By | ECS G733G |
Drivers
Your laptop should have a backup copy of all the drivers, you can find it by browsing to the c:\applications\drivers folder.
Memory Upgrades
As far as I know this laptop has one memory slot which is underneath the keyboard. To upgrade the memory use the following instructions.
- Turn off the computer and disconnect the AC adapter and all peripherals.
- Remove the keyboard by releasing the 4 retractable clips at the front of the keyboard with a small screwdriver (see diagram below).
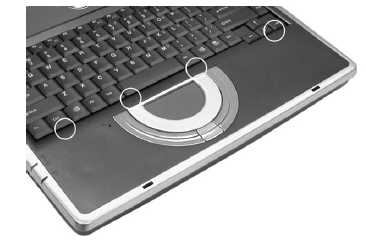
- Lift the keyboard clear of the notebook, there is a ribbon cable attached to the keyboard so take care.
- Next remove the metal cover in the middle of the case, this is held in by one screw (see diagram below)
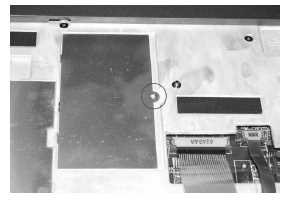
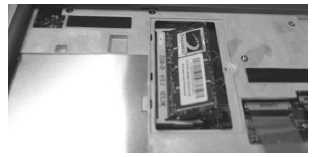
- You now have access to the memory slot
Bottom of Laptop
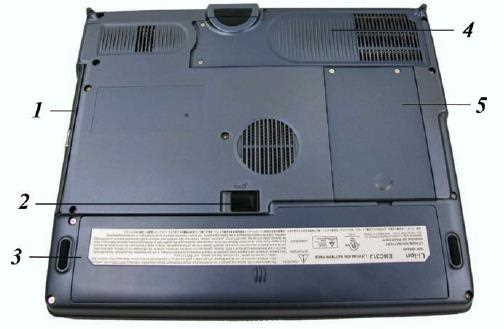
- CD-ROM/DVD-ROM/Combo Drive
- Battery Release Latch
- Battery
- CPU Compartment
- Hard Disk Drive
Function Keys
Fn + F2 - Turns volume on/off
Fn + F3 - Decrease speaker volume
Fn + F4 - Increase speaker volume
Fn + F5 - Enables/disables the touchpad
Fn + F7 - Decrease brightness
Fn + F8 - Increase brightness
Fn + F10 - Expand screen or reset to original size
Fn + F12 - Toggles display between LCD, CRT, LCD+CRT, TV, CRT+TV
In the Box
Disks Supplied
- Microsoft Works 8
- Notebook utility CD
- NTI CD and DVD Maker CD
Items Supplied
- Advent 7077 notebook
- Li-ion EM-G730L2 14.8V 4400mAh battery
- Lite-On PA-1121-02 power supply. Output: 19V - 6.3A
- Mains power cable
- UK modem cable
Documentation Supplied
- Advent notebook manual
- Microsoft Windows XP Home Edition "Start here" guide
Recovery
Due to the nature of the recovery process you should not use FDISK or any other partition management software to delete the partition on your Advent computer. Doing so will prevent the recovery from functioning correctly.
Using the HDD Recovery System
Your Advent computer uses the latest recovery system that doesn't require any CDs or DVDs to restore your PC to it's original factory condition.
- There are two ways to start the recovery -
- Restart your computer. Then Press F10 repeatedly until the message "Starting System Recovery" is displayed.
- In Windows by clicking: Start / All Programs / System Recovery / System Recovery.
- The recovery will load and display a box with one option:
- Non-destructive recovery: this option will restore Windows, supplied applications, and drivers. This option will not destroy your documents or programs. These will be backed up along with the registry. These are restored at the end of the recovery process.
- System Recovery - No format: this will reinstall Windows, supplied applications and drivers. It will move your files to a folder called "My old disk structure". Any applications (except those supplied) will need to be reinstalled.
- System Recovery - Quick format: this option will erase your hard drive including your personal files. Windows, supplied applications and drivers will be reinstalled.
- Select the Non-destructive recovery option and press Next.
- You will be informed about System Restore in Windows, click Yes.
- The recovery will begin. Once this is complete click Restart.
Additional information
Press the ALT and D keys at the recovery menu to access a command prompt. This will allow access to C: drive. The command prompt will default to c:\minint\system32 where you can run a variety of tools including CHKDSK.EXE.
Reinstalling applications
From version 2.x of the recovery system onwards you can install applications from the c:\applications folder. Drivers can be installed from the c:\applications\drivers folder and utilities from the c:\applications\tools folder. You will still need to install Microsoft Works from the supplied CD.
Using the Recovery Media
If the HDD recovery doesn't work then you can recover from the discs you should have created. To use the discs (This will completely erase all your data) -
- Start the computer with the recovery CD or DVD in the DVD drive
- If the HDD already has the recovery partition in place, then you will get a screen with two options.
- Press ‘F’ . This will delete & recreate the recovery partition, then restore the user partition. Do not choose option 'R' at this screen. If you select ‘R’ from the recovery CD start-up options, then this will first check to see if the recovery partition is present on the HDD. If the recovery partition is on the HDD, then the PC will load into the recovery options screen from the recovery partition, and not from the recovery CD/DVD set.
- If a blank HDD has been put into the machine (or there are no partitions on the HDD), then you will only get the option to press 'R'. In this case, just press 'R' , and this will create the recovery partition.
- When all data is copied to the recovery partition, then the user partition is created and formatted.
How can I make a backup of the pre-installed software?
The Recovery Media Creator will remind you to create your recovery media every time you start Windows, unless you tell it to stop reminding you, dismiss it, or create the media.
To access the Media Creator start into Windows as usual, then Click Start / All Programs / System Recovery / Recovery Media Creator.
- You will be presented with a “Welcome” screen. Click Continue.
- You will be shown some information about the creation process. Click Continue and follow the on-screen instructions.
- Click Start Creation to create your System Recovery CD Set.
- The recovery creation software will advise you how many blank CDs/DVDs you will need to create your System Recovery set. A DVD has a much higher capacity than a CD and will require less discs.
- You will then be asked to insert a blank disc into your computer. Label this CD “Recovery CD 1” and then insert it into your DVD/CD Rewriter drive.
- Once you have inserted your blank disc the process should continue – If it does not, click OK to continue.
- The creation process will continue until you are prompted for a 2nd CD. Label this CD “Recovery CD 2” and then insert it into your DVD/CD Rewriter drive.
- Once the disc creation has completed you will see a “Congratulations” screen. Click OK and the program will exit.
- You have now created a complete set of Recovery disc(s) for your computer. These discs will allow you to restore your computer in case of any problems with your Windows XP software.
- Keep these discs in a safe place.
FAQ
How to Manually Run the Recovery Media Creator
If you've deleted the shortcut to Recovery Media Creator then don't panic. To run it manually open My Computer and browse to the C:\Windows\Creator folder and double click on CD Creator.