Acer File Extensions |
Advent 7097 Laptop
Specification
| CPU | Intel Pentium M735 1.70Ghz |
| Chipset | Intel i915GM |
| Memory | 512MB PC2700/3200 DDR-333 SODIMM (2 memory slots. Max 2GB) |
| Hard Drive | 40GB |
| CD Drive | DVD +/- RW Drive |
| Screen | 14.1" TFT (native resolution 1024 x 768) |
| Video Card | Intel 915GM (up to 128MB shared) |
| Sound Card | Realtek AC'97 audio |
| Network Card | Realtek 8139/810X (onboard) Intel Pro 2200BG wireless LAN |
| Modem | Actiontec MDC AC'97 v2132D Modem |
| PC Card | 1x Type I/II |
| Ports | 1x IEEE1394 (FireWire) 1x PC Card 1x LAN 1x Modem 1x Microphone 1x Headphone 1x Kensington Lock 1x S-Video (TV-Out) 1x Parallel 1x VGA 1x IR 2x USB 2.0 |
| Touchpad | Synaptics Touchpad |
| Battery | EM-520P4G (14.8v 3600mAh) |
| Power Supply | Lite-On PA-1600-06 |
| Dimensions | 32 x 326 x 258 (HxWxD in mm) |
| Colour | Silver |
| Weight | 2.7kg |
| Made By | ECS 558 |
Drivers
Your laptop should have a backup copy of all the drivers, you can find it by browsing to the c:\applications\drivers folder.
Memory Upgrades
This laptop has two memory slots, one is accessed by removing the memory compartment cover underneath the laptop (see "Bottom of Laptop" section below) the other is a bit more difficult to get to. Many thanks to Brian Tams for sending these instructions in.
The second memory slot is accessed by removing the keyboard. With the laptop closed, turn the laptop on it's end so you are looking at the rear of the unit. There are two screen/lid hinges and there are little recesses in each hinge. With a small flat bladed screwdriver just "pop" each of the recesses. Now open the laptop and place it on a flat surface. With a blunt knife or flat tool gently prize off the speaker grill, this should be loose if the rear recesses were "popped". With the speaker grill removed you should be able to see a single phillips screw. Undo this screw and the keyboard can be gently lifted and folded forward. Under the keyboard is a plate that the keyboard cable goes under. This plate has 2 screws. Removing this plate reveals the other memory module/slot. Re-assembly is a reverse of the above. Make sure that the keyboard cable is securely clipped onto the motherboard connector before screwing everything back as it is not held in very tightly.
Bottom of Laptop
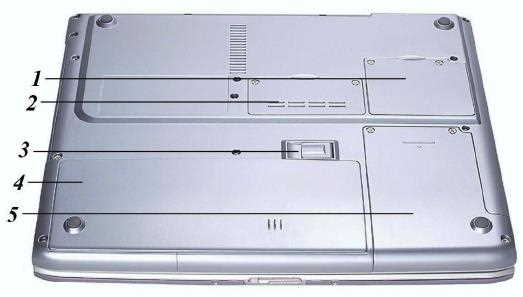
- MiniPCI Compartment. Contains Wireless LAN card
- Memory Compartment. Contains one of the memory sockets
- Battery Release Latch
- Battery
- Hard Disk Drive
Function Keys
Fn + F1 - Turn battery beeping sound on/off
Fn + F2 - Mute sound
Fn + F3 - Decrease speaker volume
Fn + F4 - Increases speaker volume
Fn + F5 - Enable/disable the touchpad
Fn + F7 - Decrease display brightness
Fn + F8 - Increase display brightness
Fn + F10 - Expand video screen or reset to its original size
Fn + F12 - Toggle the display between LCD, CRT, LCD+CRT, LCD+TV, and TV
Fn + NumLk - Enables/disables the numeric keypad
Note - The F10 and F12 functions will be disabled when the system is in Overlay (playing video) or Extended Desktop mode.
In the Box
Disks Supplied
- Microsoft Works 8
Items Supplied
- Advent 7097 notebook
- LiteOn power supply. Output: 19V - 3.16A
- Mains power cable
- UK modem cable
Documentation Supplied
- Advent notebook manual
- Microsoft Windows "Start here" guide
Recovery Disc
Due to the nature of the recovery process you should not use FDISK or any other partition management software to delete the partition on your Advent computer. Doing so will prevent the recovery from functioning correctly.
Using the HDD Recovery System
Your Advent computer uses the latest recovery system that doesn't require any CDs or DVDs to restore your PC to it's original factory condition.
- There are two ways to start the recovery -
- Restart your computer. Then Press F10 repeatedly until the message "Starting System Recovery" is displayed.
- In Windows by clicking: Start / All Programs / System Recovery / System Recovery.
- The recovery will load and display a box with one option:
- Non-destructive recovery: this option will restore Windows, supplied applications, and drivers. This option will not destroy your documents or programs. These will be backed up along with the registry. These are restored at the end of the recovery process.
- System Recovery - No format: this will reinstall Windows, supplied applications and drivers. It will move your files to a folder called "My old disk structure". Any applications (except those supplied) will need to be reinstalled.
- System Recovery - Quick format: this option will erase your hard drive including your personal files. Windows, supplied applications and drivers will be reinstalled.
- Select the Non-destructive recovery option and press Next.
- You will be informed about System Restore in Windows, click Yes.
- The recovery will begin. Once this is complete click Restart.
Additional information
Press the ALT and D keys at the recovery menu to access a command prompt. This will allow access to C: drive. The command prompt will default to c:\minint\system32 where you can run a variety of tools including CHKDSK.EXE.
Reinstalling applications
From version 2.x of the recovery system onwards you can install applications from the c:\applications folder. Drivers can be installed from the c:\applications\drivers folder and utilities from the c:\applications\tools folder. You will still need to install Microsoft Works from the supplied CD.
Using the Recovery Media
If the HDD recovery doesn't work then you can recover from the discs you should have created. To use the discs (This will completely erase all your data) -
- Start the computer with the recovery CD or DVD in the DVD drive
- If the HDD already has the recovery partition in place, then you will get a screen with two options.
- Press ‘F’ . This will delete & recreate the recovery partition, then restore the user partition. Do not choose option 'R' at this screen. If you select ‘R’ from the recovery CD start-up options, then this will first check to see if the recovery partition is present on the HDD. If the recovery partition is on the HDD, then the PC will load into the recovery options screen from the recovery partition, and not from the recovery CD/DVD set.
- If a blank HDD has been put into the machine (or there are no partitions on the HDD), then you will only get the option to press 'R'. In this case, just press 'R' , and this will create the recovery partition.
- When all data is copied to the recovery partition, then the user partition is created and formatted.
How can I make a backup of the pre-installed software?
The Recovery Media Creator will remind you to create your recovery media every time you start Windows, unless you tell it to stop reminding you, dismiss it, or create the media.
To access the Media Creator start into Windows as usual, then Click Start / All Programs / System Recovery / Recovery Media Creator.
- You will be presented with a “Welcome” screen. Click Continue.
- You will be shown some information about the creation process. Click Continue and follow the on-screen instructions.
- Click Start Creation to create your System Recovery CD Set.
- The recovery creation software will advise you how many blank CDs/DVDs you will need to create your System Recovery set. A DVD has a much higher capacity than a CD and will require less discs.
- You will then be asked to insert a blank disc into your computer. Label this CD “Recovery CD 1” and then insert it into your DVD/CD Rewriter drive.
- Once you have inserted your blank disc the process should continue – If it does not, click OK to continue.
- The creation process will continue until you are prompted for a 2nd CD. Label this CD “Recovery CD 2” and then insert it into your DVD/CD Rewriter drive.
- Once the disc creation has completed you will see a “Congratulations” screen. Click OK and the program will exit.
- You have now created a complete set of Recovery disc(s) for your computer. These discs will allow you to restore your computer in case of any problems with your Windows XP software.
- Keep these discs in a safe place.
FAQ
How to Enable the Wireless Function
The Advent 7097 has an Intel Pro 2200BG wireless card but unlike a lot of laptops it doesn't have a switch to turn the wireless access on/off. This is because the Intel wireless card is controlled via software so you should be able to switch it on/off via the Intel Utilities in the Start menu.
Sometimes the wireless software may not appear in the start menu, in which case the wireless card can be controlled via Device Manager.