Acer File Extensions |
Advent 8117 Laptop
Specification
| CPU | Intel Pentium Dual-Core T2080 (1.73GHz) |
| BIOS | Phoenix BIOS. Press F2 to enter |
| Chipset | Mobile Intel 943GML Express |
| Memory | 1GB DDR2 PC2-4200 (2 Memory Slots. Max 2GB) |
| Hard Drive | 120GB Hitachi HTS541612J9SA00 *** |
| CD Drive | Optiarc DVD±RW AD-7560A |
| Screen | 17" Widescreen TFT (native resolution 1440x900) |
| Video Card | Intel 943GML (up to 128MB shared) |
| Sound Card | Realtek High Definition Audio |
| Modem | Not installed * |
| Network Card | Realtek 8139 / 810X (Onboard) RaLink RT73 Wireless card ** |
| PC Card | 1 x ExpressCard/54 slot (also supports ExpressCard/34) |
| Ports | 1x Microphone 1x Headphone 1x Kensington Lock 3x USB 2.0 1x Expresscard Slot 1x 4-in-1 Card Reader (Supports SD, MS, MS Pro, MMC cards) 1x IEEE1394 (FireWire) 1x LAN 1x S-Video (TV-Out) 1x VGA |
| Battery | L51-3S4000-C1L1 (11.1v 4000mAh) L51-3S4400-C1L3 (10.8v 4400mAh) L51-3S4400-C1P3 (10.8v 4400mAh) L51-3S4400-G1B1 (11.1v 4400mAh) L51-4S2000-G1L1 (14.8v 2000mAh) L51-4S2200-G1L3 (14.4v 2200mAh) |
| Dimensions | 44.4 x 402 x 285.5 (HxWxD in mm) |
| Colour | Silver |
| Weight | 3.6kg |
| Made By | Uniwill L71II3 |
* While the case does have a modem port, it should be blocked off as the laptop doesn't have a 56k modem built-in.
** Wireless Lan on/off switch on front of laptop (next to microphone socket)
*** May have a 120GB Toshiba MK1252GSX drive fitted instead.
Drivers
The laptop should have been supplied with a Utility CD which contains a copy of the user manual and all the drivers. As well as this your laptop should have a backup copy of all the drivers, you can find this by browsing to the c:\applications\drivers folder.
Memory Upgrades
This laptop has two memory slots, one of which is accessed by removing the panel underneath the laptop the other by removing the keyboard.
To install the DIMM under the System Device Cover, do the following:
- Power OFF the notebook. Unplug the AC cord and all cables/devices attached to the notebook. Remove the battery
- Place your hand on a large metal object momentarily to discharge any static electricity. Place the notebook on a flat surface and fully close the LCD lid
- Locate and remove 9 Screw A’s on the System Device Cover
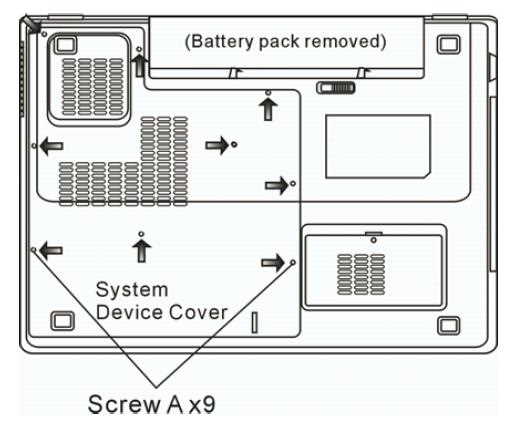
- Remove the System Device Cover. The DIMM socket is now visible
- If you need to remove an old DIMM from the socket, press out on the latches located on both edges of the socket at the same time. The DIMM should pop up to an angle of 30 degree. Pull the DIMM module out of the memory socket.
- Install the new DIMM module into the memory socket. The DIMM will only fit in one orientation. Insert the DIMM at an angle of approximately 30 degrees into the empty memory socket. Then press it firmly so that the contact edge is driven into the receiving socket
- Pivot the DIMM until the latches on both sides of the socket snap into place.
- Put the System Device Cover back and tighten 9 Screw A’s
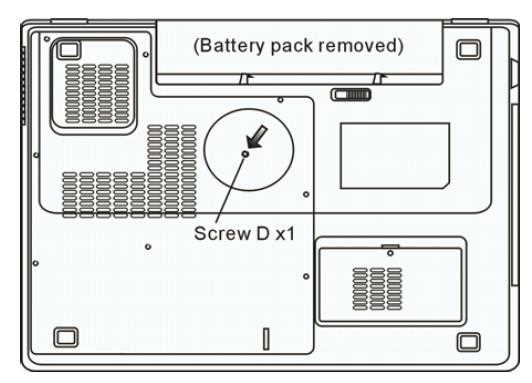
To install the DIMM under the keyboard, do the following:
- Remove Screw D
- Find the keyboard latches near the edges of the keyboard. The latch is spring-loaded. It will retract when pressed and revert back to its original position when released. Use a small blade to press the latch inward. The keyboard tray should pop up slightly over the latch. If the keyboard tray does not pop up, try to gently lift it up slightly above the latch. Repeat this step for the other keyboard latches
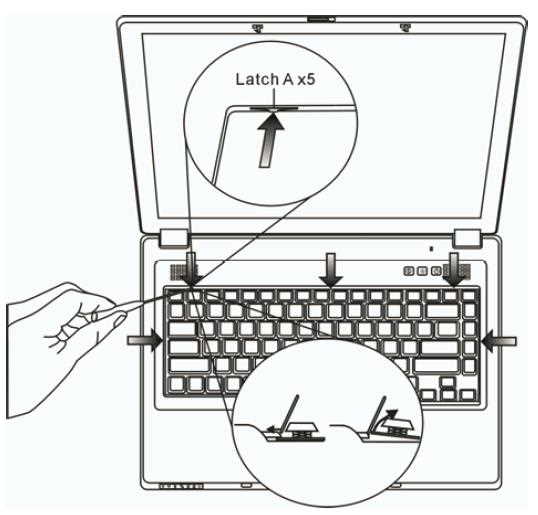
- Carefully lift up the top edge and position the keyboard out of the way
- The memory slot should now be visible. If you can't see it then it may be hidden under a metal plate which is accessed by removing the single retaining screw
- If you need to remove an old DIMM from the socket, press out on the latches located on both edges of the socket at the same time. The DIMM should pop up to an angle of 30 degree. Pull the DIMM module out of the memory socket
- Install the new DIMM module into the memory socket. The DIMM will only fit in one orientation. Insert the DIMM at an angle of approximately 30 degrees into the empty memory socket. Then press it firmly so that the contact edge is driven into the receiving socket
- Pivot the DIMM until the latches on both sides of the socket snap into place
- Put the keyboard back to its original position. Make sure the edge of the keyboard now resides under the spring-loaded latches
- Re-attached Screw D
Bottom of Laptop
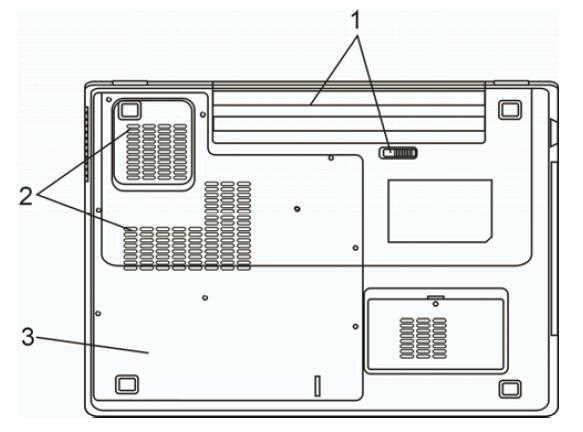
- Battery Pack and Battery Latch. Slide the battery latch to release the battery pack
- Ventilation Grill. Do not block this airway completely
- System Device Cover. The system’s processor with cooler assembly, Wireless LAN module, HDD, and DDR memory module are located under the case cover
Activity Lights
There are 7 activity lights situated in the bottom left-hand corner of the laptop. From left to right they show the following -
- Power Light
- Green light indicates the system is ON
- Blinking green light indicates the notebook is in suspend mode
- Wireless Internet
- Green light indicates the WLAN is active.
- Battery Light
- Blinking orange light indicates the battery is being charged
- Blinking red light indicates the battery power is low when the system is turned ON
- Persistent green light indicates the battery is Full
- Hard Drive light - Green light indicates the disk is being accessed
- Caps lock - Green light indicates the caps lock is activated
- Num Lock - Green light indicates the numeric keypad is activated
- Silent mode - Green light indicates that Silent Mode is activated
Function Keys
Fn + F1 - Sleep Mode
Fn + F3 - Mute
Fn + F4 - Toggle the display between LCD, CRT, LCD+CRT, and TV
Fn + F5 - Increase volume
Fn + F6 - Decrease volume
Fn + F7 - Increase brightness
Fn + F8 - Decrease brightness
In the Box
Disks Supplied
- Microsoft Works 8.5
- Notebook Utility CD
Items Supplied
- Advent 8117 notebook
- Li Shin power supply. Output: 20V - 3.25A
- Mains power cable
- UK modem cable
Documentation Supplied
- Advent Windows Vista user guide
- Advent recovery guide
- Advent Safety guide
Recovery Disc
Hard Drive Recovery
Should your Windows develop serious errors or fail to start, you can restore your computer back to factory settings by using the hard drive recovery located on a hidden partition on the hard drive.
To restore your computer back to factory settings, follow the steps below:
- Turn on the computer and keep tapping F8 until the advanced options menu is displayed
- Use the up/down arrow keys on the keyboard to highlight Repair Your Computer and press enter to select it
- Select the language you wish to install (normally English is the only option)
- Once you have chosen your language you will be presented with the available recovery options
- Microsoft Repair Environment - after choosing the UK keyboard layout you will be asked to choose the Operating System you wish to repair. If Windows Vista is not listed then you cannot repair the OS without doing the full recovery. After choosing Vista the Microsoft Vista startup repair tool will run and attempt to repair any startup problems you are experiencing
- Reinstall Windows - gives you the options available to reinstall Vista
- Advanced Options - this launches the diagnostic centre allowing you to run chkdsk, launch notepad or bring up a command prompt
- Exit & restart computer - Exits withut running the recovery process
- To continue with the recovery program you need to choose Reinstall Windows
- On the next screen you have the ability to launch Vista System Restore and roll back to a date when Vista was last working ok or to run the Full Destructive Recovery. To continue with the recovery program you need to choose Start Full Destructive Recovery
- After choosing the Full Destructive Recovery option you are presented with the warning screen that all data will be lost. It is important to make sure all data has been backed up to disk if possible and to realise this process deletes all data and reverts the machine back to it's default state. To continue with the recovery program you need to tick the box indicating you are aware of data loss
- The recovery process will then run through, the computer will restart a couple of times during this. You will also need to go through the Vista "Out of Box Experience", to configure Vista. This is fairly straightforward so just follow the onscreen instructions
Recovery DVD Creator
Your computer comes supplied with a hard drive based recovery allowing you to reinstall Windows Vista very easily should the need arise. You also have the ability to create a recovery DVD which is recommended on all machines. To create a recovery DVD (note - you cannot use CDs) do the following.
- Double click on the Techguys DVD icon on the desktop or from the start menu
- The first screen will prompt you to insert a DVD into your drive. Click OK.
- On the next screen make sure your DVD drive is selected in the 'To' field. To reduce the risk of errors ensure the write speed is set to the lowest value and tick verify recorded data. Click Burn
- Once the process has completed, label your DVD, keep it in a safe place and in a protective case to avoid damage
DVD Recovery
Should your Windows develop serious errors or fail to start, you can restore your computer back to factory settings by using the Recovery DVD you may have created or been sent.
To restore your computer back to factory settings, follow the steps below.
- Start the computer with the Recovery DVD in the optical disc drive
- After the usual startup screen has vanished press a key when prompted to load from the DVD
- Select the language you wish to install (normally English is the only option)
- Once you have chosen your language you will be presented with the available recovery options
- Microsoft Repair Environment - after choosing the UK keyboard layout you will be asked to choose the Operating System you wish to repair. If Windows Vista is not listed then you cannot repair the OS without doing the full recovery. After choosing Vista the Microsoft Vista startup repair tool will run and attempt to repair any startup problems you are experiencing
- Reinstall Windows - gives you the options available to reinstall Vista
- Advanced Options - this launches the diagnostic centre allowing you to run chkdsk, launch notepad or bring up a command prompt
- Exit & restart computer - Exits withut running the recovery process
- To continue with the recovery program you need to choose Reinstall Windows
- On the next screen you have the ability to launch Vista System Restore and roll back to a date when Vista was last working ok or to run the Full Destructive Recovery. To continue with the recovery program you need to choose Start Full Destructive Recovery
- After choosing the Full Destructive Recovery option you are presented with the warning screen that all data will be lost. It is important to make sure all data has been backed up to disk if possible and to realise this process deletes all data and reverts the machine back to it's default state. To continue with the recovery program you need to tick the box indicating you are aware of data loss
- The recovery process will then run through, reinstalling Vista and also recreating the hard drive recovery system for future use.
- When it has finished copying files it will ask you to remove the DVD and then restart the computer. It will then go through setting up Vista, you will need to go through the Vista "Out of Box Experience". This is fairly straightforward so just follow the onscreen instructions