Acer File Extensions |
Apricot Easy Manager
Easy Manager is the entertainment management software that is pre-installed onto your computer. This section aims to give you help and guidance when you get stuck. We will cover such items such as the Answerphone facility and Sending and Receiving faxes, and any updates to your software will be provided here.
Sending and Receiving Faxes
As the functionality and usage of modems has increased over the last two years, particularly with home users, it has become apparent that setup and configuration issues are causing problems to some customers. Listed here are some of the questions and answers which have been raised in connection with Apricot MMxxxxx and MFxxxxx consumer PCs.
How do I setup the Fax service?
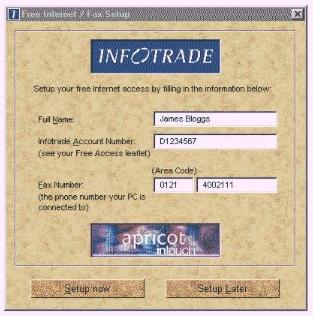
 On Apricot systems which have the Infotrade Internet access offer, we have simplified the Fax setup procedure by including it under the Internet Access Setup icon located on the Windows 95 desktop. Double click on this icon and the "Free Internet / Fax Setup" window will be displayed. By entering details found on your Infotrade Internet leaflet, supplied in the box with your PC, and entering the telephone number your computer is connected to, both Fax and Internet elements of Windows 95 will be setup automatically.
How do I receive Faxes?
In order to receive a Fax message, either Microsoft Exchange (the Inbox icon on the desktop) or Apricot Message Center needs to be loaded and running. Once one of these programs has been loaded, the Fax icon will appear in the "System Tray" portion of the "Status Bar".

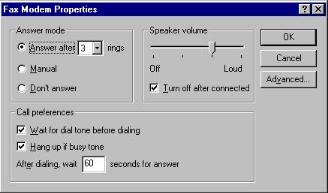
By left mouse button clicking on the Fax icon, The "Microsoft Fax Status" windows will be displayed. Left mouse button click on the "Options" menu and select "Modem Properties...".
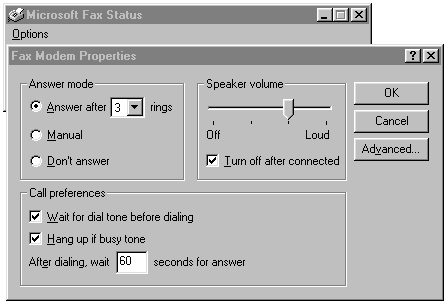
The default setting for answer mode is "Don't answer" so this needs to be changed to either "Manual" or "Answer after (x) rings".
In manual answer mode, when the phone rings a message box will be displayed asking if you wish to receive a Fax message. Click on "Yes" to receive the Fax and have it stored in your message inbox or "No" to have the Fax application ignore the call. The only exception to this is when Microsoft Operator is being used. This will override the manual answer setting and automatically receive the Fax if appropriate. Microsoft Operator is discussed later in this document.
Once received, the Fax message may be viewed using Apricot Message Centre of Microsoft Exchange (the Inbox icon on the desktop).
Note
Apricot Message Centre 2.0 is not able to change the orientation of received Faxes or print them out. If this option is required, use Microsoft Exchange to view Faxes.
How do I send a Fax?
There are two methods of sending a Fax using the Windows 95 Fax services but before starting the process, make sure that the Fax service has been setup (see "How do I setup the Fax service?"). As standard, Apricot MMxxxxx and MFxxxxx consumer PCs are pre configured to include the necessary Windows 95 components.
Method 1
From the "Start" button, select "Programs", "Accessories", "Fax" and "Compose New Fax". The Fax icon will appear in the "System Tray" and the following Windows will be displayed.
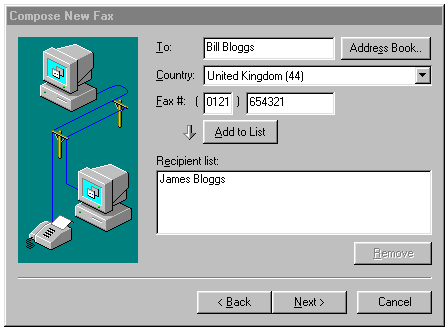
Enter the names and Fax numbers of the people you want to send the Fax to. If you want to send the same Fax to more that one person, use the "Add to List" button to enter names into the "Recipient list", then click on "Next >" to display the cover page windows.
Here you can select the type of cover page you wish to use from a list of predefined samples or select your own previously created cover page (using the Cover Page Editor in the Fax menu group). The "Options" button enables you to select the time the Fax is to be sent in order to take advantage of discount phone rates at off peak times but remember, your PC needs to be left switched on at the defined time to be able to send the Fax.
For the purpose of this example, select the "Generic" cover page, don't set any
of the options and click on the "Next >" button to show the subject and notes window.
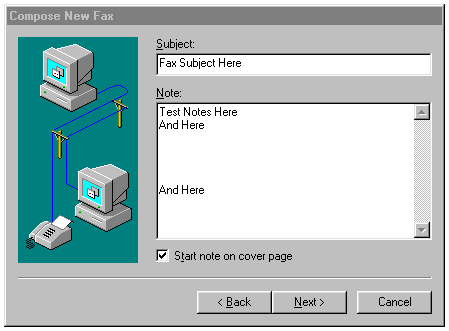
At this point you can enter the topic of your Fax, in the "Subject" box, and the text you wish to send, in the "Notes" box. If you want to send a more advanced Fax, one which includes pictures in addition to text, then this will need to be prepared in advance using your favorite word processor and attached to the Fax at a later stage. If you are only intending to send text then the "Notes" box will probably cover most requirements. When all your notes have been completed, click on the "Next >" button to show the file attachment windows.
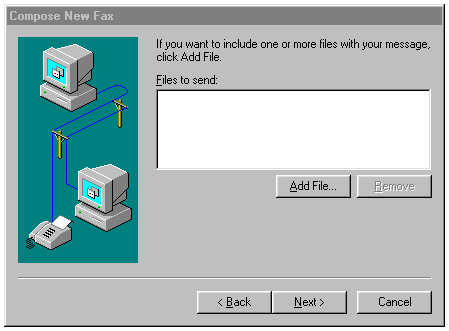
At this point, if required, you can attach a previously created file(s) by clicking on the "Add File" button and selecting it from the displayed list (you will need to remember the directory the file was saved in). Now click on the "Next >" button to complete the process and display the final window.
The Fax is now ready to send. If you are happy with the selections you have made then click on the "Finish" button to begin the transmission process. The Microsoft Fax Status windows will be displayed and show the various stages necessary to send the Fax.
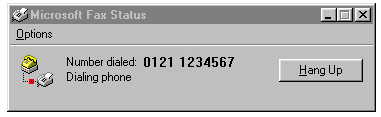
Once the Fax has been sent the modem will disconnect from the phone line and the Fax Status windows will disappear.
Method 2
This method still uses the Microsoft Fax services to transmit the Fax but rather than using the "Compose New Fax" application, the starting point is your favorite word processor.
Use the word processor, in this example "WordPad", to compose the text and, if you wish, graphics for your Fax. When you have finished, click on the "File", then "Print" menu options.
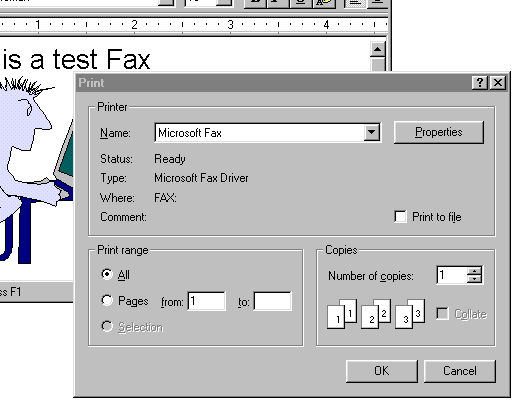
From the printer name list, select Microsoft Fax and click the "OK" button. The "Compose New Fax" application will start as previously covered in Method 1 and the steps may be followed as before. The only difference between Method 2 and Method 1 is that you will not be asked if you wish to attach a file to the Fax transmission.
Apricot Answerphone
The Apricot Answerphone answers your incoming telephone calls automatically. Calls may be either voice or fax messages.
- A voice message (also known as voice mail) is recorded by the Answerphone and can then be replayed in the Message Centre.
- A fax message is received by the Answerphone (using the Microsoft Fax service included in Windows 95) and can then be reviewed in the Message Centre.
Note - The Answerphone program does not enable your computer to be used as a "hands-free" telephone, even if a microphone is attached.
To turn on or off the Answerphone
Double-click the Answerphone icon ![]() in the Windows 95 taskbar.
in the Windows 95 taskbar.
- Click the General tab
- Click the Answerphone is OFF button. The legend on the button changes to "Answerphone is ON"
- Click the button below the ON/OFF button to set the Answerphone to Answer immediately, or Answer after 3, 5 or 10 rings. Again, the legend on the button changes when you click it
- Click OK
Now, when an incoming voice message is received, the Answerphone records it (for up to a maximum of three minutes) and it can be played back in the Message Centre.
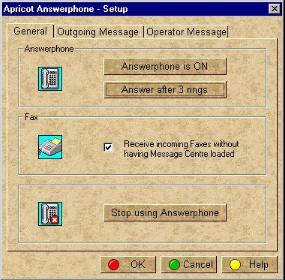
To set up the Answerphone to receive faxes
Turning on the Answerphone is sufficient to get it to accept voice messages, but not fax messages. This is because the Answerphone uses the Microsoft Fax service, which is nitially set not to answer incoming calls. To set up the answerphone to receive faxes do the following.
- Double-click the Answerphone icon
 in the Windows 95 taskbar
- Click the General tab
- Select the Receive incoming faxes option, then click OK
- Click the Microsoft Fax icon
 in the Windows 95 taskbar
- In the Microsoft Fax Status dialog, click the Options menu then click Modem Properties
- In the Fax Modem Properties dialog, set the Answer Mode to Answer after 3 rings then click OK
Once received, fax messages can be viewed in the Message Centre.
Software Updates / Troubleshooting
Windows 98
After upgrading to Windows 98 on an MS series machine, you may find that the message light (and on systems with it fitted, the message button) features of the Easy Manager software do not function as expected.
According to Mitsubishi/Apricot, and I quote - "Easy Manager is tightly integrated with a number of core components in the OEM supplied version of Windows 95 as supplied on the MS Series systems, and as such will NOT operate with the same degree of functionality under Windows 98, which has a different driver and kernel structure. Both of the above problems have been investigated, but due to the nature of the Easy Manager product, Mitsubishi Electric PC Division will NOT be releasing an upgrade to Easy Manager for use with Windows 98. Also, the existing Easy Manager product will NOT be supported on systems running Windows 98."
Disabling Easy Manager
On the most recent Apricots, if you look in the C:\APRICOT directory, you will find EZ-CONFIG. Double click on this and you can disable easy manager. The same directory also contains backups of soundblaster, video, modem software, and other stuff which might save using the recovery CD.