 Acer File Extensions |
Hewlett Packard DeskJet 695c
If you need the user manual or software for your printer you can download it from the Printer Support section of the Hewlett Packard website.
Gibberish or Blank Page Printed
A Blank Page or a Page with Characters Printed Across the Top Prints Before the Print Job
This problem can be caused by one of two things:
If the software for a Logitech parallel port scanner is installed, the Xerox Colour Manager (XCM) and Wakeup program installed by the Logitech scanner may be causing the problem and may need to be disabled. (This issue may occur even if the Logitech scanner and printer are connected to different parallel ports or if the scanner has been disconnected from the computer). To disable this, follow these instructions,
- Right-click Start and click Open.
- Double-click Programs.
- Double-click Startup.
- If there is an icon for Xerox Colour Manager or XCM, click the icon and while continuing to hold down the mouse button; drag the icon onto the Window 95 Desktop.
- If there is an icon for the Wakeup program, drag and drop the icon onto the Windows 95 Desktop.
- Close the Startup and Programs windows.
- Click Start and click Run.
- In the Open box, type SYSEDIT and click OK to load the System Configuration Editor. Click the window whose heading reads: C:\WINDOWS\SYSTEM.INI.
- In the [boot] section, locate the line that says:
drivers=mmsystem.dll ... WAKEUP16.DLL. - On the drivers= line that reads C:\WINDOWS\TWAIN\PAGESCAN\WAKEUP16.DLL, place a semicolon at the beginning of the line so that it reads:
;C:\WINDOWS\TWAIN\PAGESCAN\WAKEUP16.DLL - On the File menu, click Exit. Click Yes to save the changes.
- Restart Windows 95 to have the changes take effect.
If you are running Windows 95, the LPT.VXD file may need to be updated. To do this,
- Place the Microsoft Windows 95 CD-ROM disk in the CD-ROM disk drive.
- Click Start, point to Programs, and click Windows Explorer.
- When Windows Explorer opens, from the View menu, click Options. Click Show all files and click OK.
- Click the C:\WINDOWS\SYSTEM folder within Windows Explorer and do the following:
- Click LPT.VXD.
- On the File menu, click Rename.
- Rename the file as LPT.OLD and press ENTER.
- While still in Explorer, select the CD-ROM drive (usually D:) and click the DRIVERS\PRINTERS\LPT folder.
- Click the LPT.VXD file, and on the Edit menu, click Copy.
- Select the C:\WINDOWS\SYSTEM folder.
- On the Edit menu, click Paste.
- Close Windows Explorer and restart Windows 95.
"Folder Was Moved or Removed" Error
"Folder Was Moved or Removed" error during printer install
When the driver for a variety of HP DeskJet printer models is installed after a fresh Windows 98 install, a system dialog box appears with the following message:
"C:\WINDOWS\Start Menu\Programs\_____HP_G_ is not accessible. This folder was moved or removed."The solution is to click OK on the error message, and continue with the install. Reboot the computer and try a print job. Everything should function normally.
Toolbox Icon Missing
When the printer software is installed by Plug and Play in Windows 98, the Toolbox icon is not properly installed on the Windows Desktop.
The solution is to create the Toolbox shortcut icon manually by following these steps:
- Position the cursor on the Windows desktop, and click the right mouse button.
- In the menu that appears, select New and then select Shortcut.
- Click the Browse button in the Create Shortcut dialog box.
- Browse to the C:\ drive, select the WINDOWS folder; then select HPFTBX08.EXE. Click the Next button. (Depending on the version of the driver, it may be HPFTBX07.EXE, HPFTBX06.EXE, or HPFTBX05.EXE).
- Give your shortcut a name, such as "HP DeskJet 690C Series Toolbox." Click the Finish button.
"Update Device Wizard" Appears
The Update Device Wizard appears with the HP license agreement when installing an HP DeskJet printer driver through the Add Printer icon in Windows 95 or 98.
-Or-
The Update Device Wizard appears every time Windows 95 or 98 is started and prompts you to install the HP DeskJet printer.
To complete the Update Device Wizard, do the following:
- Click Next when the Update Device window appears.
- Click Finish to the message indicating a new driver could not be found. The Update Device window will not appear again for this printer.
- If the HP DeskJet printer driver is being installed, click Agree To License to continue with the HP printer driver installation.
Printing a Test Page
You can print a test page from your HP DeskJet printer in two different ways.
Hardware Test
- Turn the printer off and remove the cable that connects the printer to the computer.
- Turn the printer back on.
- Press and hold the Resume (top) button for approximately five (5) seconds.
- The test page should look like this:

Software Test
- Double-click the HP Toolbox icon on your desktop.
- On the Printer Services tab of the HP Toolbox, click Print a test page.
- The test page should look like this:

Front Panel Lights & Buttons
Two different buttons and lights are located on the front of the printer:
![]() Resume
Resume
![]() Power
Power
The Resume and Power buttons and lights do two things: they show you when your printer is operating correctly and when your printer needs attention. These buttons control your printer.
How the lights blink or do not blink tells you how your HP DeskJet printer is operating:
| When Power | |
|---|---|
| Your printer is turned off. Press Power | |
The printer is ready to print. Send a document to the printer. | |
| One of three things might have happened: 1. Your printer is out of paper. Check the lower (IN) tray to make sure it contains paper and that the paper is correctly loaded in the tray. 2. The top cover of your printer is open. Close the cover. 3. The ink cartridge may not have been installed correctly. Make sure the cartridge is securely snapped into the printer and the arrow on the top of the cartridge is almost touching the v-shaped notch in the top of the print cartridge cradle. Press Resume | |
| Either your computer is sending a document to your printer or your printer is printing a document. | |
| An error has occurred in your printer. Press Power | |
| Your printer has a problem. See the Troubleshooting tab in the HP Toolbox. |
Printer Properties Screen
Windows 98, I Can't See the Setup, Features, Colour, and Services Tabs
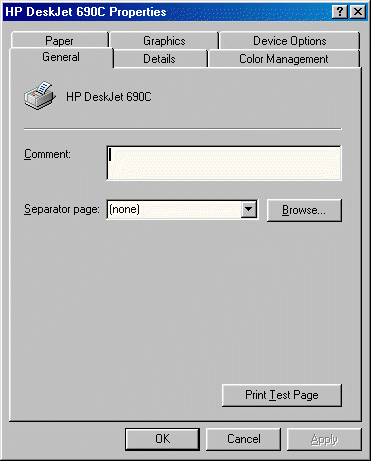
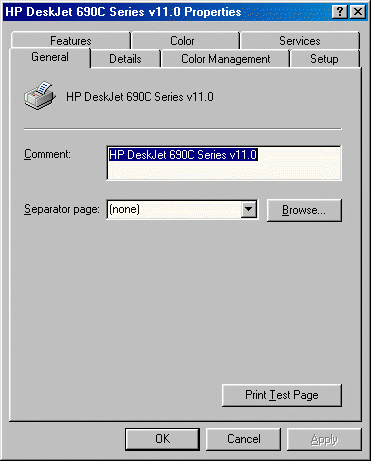
If you installed one of Microsoft's printer drivers that came pre-loaded on Windows 98 for your printer, you will not see the Set-up, Features, Colour, and Services tabs within the printer properties. You will need to uninstall or remove the Microsoft printer driver and install the HP printer software by using the CD or disks that came with your printer.
- Click Start, Settings, and then Printers.
- Click once on the HP DeskJet 690C series printer icon. This will highlight the icon.
- Click on File and then click on Delete.
- When asked if you are sure you want to delete the printer, click Yes.
- When asked if you want to delete files that are no longer needed for the printer, click Yes.
- A window will appear stating that another printer has been set as the default printer. Click OK.
- Close the Printers window.
- Click Start and click Shut Down.
- Select Restart and click OK.
- Installing the HP DeskJet 690C Series Printer Driver
You can install your printer's driver either from a CD-ROM disk or from floppy disks that may have been included with your printer or that may have been ordered from HP Software Distribution.
Microsoft Printer Driver (Incorrect)

HP Printer Driver (Correct)

Troubleshooting Using HP Toolbox
How to Use the HP Toolbox to Solve Common Printer Problems
- Double-click the HP Toolbox shortcut (or icon) on your desktop.
- Click the Troubleshooting tab.
- Click the appropriate category. The following are your choices:
- Print quality is poor
- Placement on the page is wrong
- Something on the page is missing or incorrect
- No page came out of the printer
- A blank page came out
- Having problems printing a banner
- View known software conflicts
HP Toolbox offers you selections for each category. Select the choice that best describes the problem. HP Toolbox then gives you possible causes of the problem.
Reinstall/Replace Cartridge Error
Message to Reinstall or Replace Print Cartridge Displays After the Cartridge Has Been Replaced
You may receive a message directing you to reinstall or replace the colour print cartridge, 51649A, after you have just replaced it. This happens when the print cartridge stops working, which can be caused by:
- Poor contact between the print cartridge and the carriage assembly.
- Damaged traces on the circuitry.
To get round this,
- Clean the cartridge contacts with a clean, dry cloth.
- Reinsert the print cartridge and close the printer lid. The problem has been corrected if the carriage returns to the right side of printer and you are able to print without receiving the error message.
- If the carriage remains in the center of the printer when you close the lid, you will need to replace the colour print cartridge. If the carriage returns to the right side, but you still get the error message, you will need to replace the colour print cartridge.
Paper Will Not Load/Grinding Noise/Carriage Stall
This document provides a possible solution if your printer is not printing and exhibits one or more of the following symptoms:
- Drive rollers rotate but do not pick up paper.
- The printer emits loud, grinding noises.
- Printer lights are blinking.
- The carriage assembly, which holds the ink cartridges, stalls at the left side of the printer. A paper jam may have occurred previously.
The cause of the problem may be that the printer's clutch actuator is disengaged. Follow these instructions to re-engage the clutch actuator.
- Open the printer lid.
- Unplug the power cord from the back of the printer.
- Remove the upper (OUT) paper tray.
- Slide the carriage assembly, which holds the ink cartridges, away from the left side of the printer.
- If the carriage assembly is stuck on the left side, push down on the large black bar directly above the three large rollers and release it so it springs back up. Gently lift the carriage assembly and try moving it to the right again.
- Locate the metal gear assembly at the left side of the printer. Directly above the metal gear is the clutch actuator (also known as the slider arm), a small plastic arm approximately 50 mm (2 inches) in length. On the right edge of the clutch actuator is an "arrow" or "tooth" that points down. The arrow on the clutch actuator should be in the space to the right of the metal gear and plastic half-gear just below the clutch actuator.
- If the arrow on the clutch actuator is stuck between the metal gear and plastic half-gear, lift the clutch actuator and move the arrow to the right of the plastic half-gear. Once the arrow on the clutch actuator is to the right of the gears, the clutch actuator should move freely right and left about 12.7 mm (0.5 inches).
- Replace the upper (OUT) paper tray.
- Close the printer lid.
- Plug in the power cord to the back of the printer.
- Turn the printer on.
- Print a self-test by pressing and holding the Resume button (upper button) for five seconds and releasing it.
- If the same problem still exists, verify that both ink cartridges are snapped into the carriage tightly and are not loose.
- Try printing a self-test again.
- If the same problem still exists, contact the HP Customer Care Center listed in the printer User's Guide.
To Prevent a Recurrence
Carriage stalls caused by the clutch actuator being out of position can result from:
- Clearing paper jams by pulling the paper out of the printer without first turning the printer off.
- Improper ink cartridge installation, causing the cartridge to bump the clutch actuator and push it out of position.
To prevent this problem from occurring in the future, always turn off the printer before trying to clear a paper jam. Ensure the ink cartridges are installed correctly.
Paper Feed Problems
Paper-Pick Problem
If the Resume light blinks, the HP DeskJet printer may be detecting a paper-pick (feed) problem. A paper-pick problem occurs if the printer tries to pull paper from the IN tray to the platen (paper-feed mechanism) but does not detect paper at the Out Of Paper Sensor (OOPS) flag. Here are some of the probable causes and solutions,
- The IN tray is out of media.
- Load media in the IN tray and press the Resume button.
- Media are not properly loaded.
- Remove media, re-square the stack, and reload the media in the IN tray. Then press the Resume button.
- The media-width adjuster or media-length adjuster is not properly set.
- Ensure the media-width adjuster is against the left side of the stack, but is not blocking the stack.
- Push in on the media-length adjuster to ensure the media are fully seated in the printer. Do not push too hard, causing the media to buckle.
- The IN tray is too full.
- Load no more than 100 sheets of 20 lb. paper in the IN tray.
- Media are outside of specifications.
- Verify that the media meet media specifications. If they are outside of specifications, replace the media in the IN tray.
- The drive rollers need cleaning.
- Clean the drive rollers with a soft cotton cloth slightly dampened with water.
- The OUT tray assembly is not properly installed on the HP DeskJet printer.
- Remove and reinstall the OUT tray assembly.
- Different media types, sizes, or weights are loaded at the same time.
- Reload the stack with media of only one type, size, and weight.
- Media are improperly loaded.
- Remove the media stack from the IN tray. Ensure the stack is even and does not contain wrinkled, curled, or damaged media. Reload the media stack.
- The HP DeskJet printer is faulty.
- Return the printer for repair.
Paper does not advance to the OUT tray
- If printing on a transparency or special paper, the HP DeskJet printer may be waiting for the automatic dry timer to complete its cycle.
- Wait a few minutes for the page to drop.
- The computer was turned off while the HP DeskJet printer was printing.
- Turn on the computer and printer to eject the page. Re-send the file to the printer if it is not complete.
- The OUT tray is not properly attached to the HP DeskJet printer.
- Remove and reinstall the OUT tray.
- Media are not properly loaded or are buckled.
- Remove and reinstall media in the IN tray.
- The media feed rollers need cleaning.
- Clean the drive rollers with a soft cotton cloth slightly dampened with water.
- The HP DeskJet printer is faulty.
- Return the printer for repair.
The printer feeds multiple pages
- Media are stuck together.
- Remove media from the IN tray, bend or flex the stack, and reload it into the IN tray.
- The IN tray is too full.
- Load no more than 100 sheets of 20 lb. paper in the IN tray.
- The IN tray contains different types of paper.
- For best results, load only one type, size, and weight of media in the IN tray at a time.
- Media were added to an existing stack in the IN tray.
- Remove the stack from the IN tray, re-square the stack, and reload it in the IN tray.
- Media do not meet the media specifications.
- Remove the media and reload with media that meet the media specifications.
- Media are damaged, such as torn, bent, or curled.
- Replace the media in the IN tray.
- The HP DeskJet printer is faulty.
- Return the printer for repair.
Envelopes do not advance into the printer
- Envelopes do not meet the media specifications.
- Replace the envelopes.
- Envelopes are improperly loaded.
- Slide the media-width adjuster to the appropriate envelope setting. For A2 and C6 size envelopes, release and lower the media-length adjuster; then push it toward the envelopes until it stops. Do not bend the envelopes.
- Envelopes are bent or damaged.
- Replaced the damaged envelopes.
- Too many or too few envelopes are in the IN tray.
- Adjust the number of envelopes in the IN tray.
- More than one envelope was loaded through the envelope-feed slot.
- Load only one envelope at a time through the envelope-feed slot.
- The envelope is not fully pushed into the HP DeskJet printer.
- Push the envelope into the printer as far as it will go without buckling.
- Paper in the IN tray is interfering with an envelope from the envelope-feed slot.
- Reload the paper in the IN tray.
Cards do not advance into the printer
- Various
- See the solutions for envelopes above.
- Ensure the card guide is flipped up in the IN tray rather than using the right wall of the IN tray.
Banner paper does not advance into the printer
- Media are not properly loaded or are buckled.
- Cancel the print job, turn the HP DeskJet printer off, and pull out the jammed media.
- Media are outside of specifications.
- For best results, print banners on HP Banner Paper. Avoid coated paper. Coated paper is coloured on one side and not on the other.
Windows 95 Spool 32 Errors
Occasionally, a Spool 32 error occurs when you are printing in Windows 95. The Spool 32 error causes the message: "Spool 32 Caused a General Protection Fault In Module GDI.EXE." to appear on your computer's screen.
Spool 32 errors may be caused by fax or answering machine software programs that have been pre-installed on the computer. The first thing to do is make sure you are using the latest version of the printer driver (updates can be downloaded from HPs website). If that doesn't cure the problem, then follow these steps,
Change spool data format from EMF to RAW
This option will change the Spool Data Format from EMF (Enhanced Metafile) to RAW (Raw data). This will change the way the Windows 95 print spooler handles the print job. These changes will not affect the program or printer functionality.
- Click Start, point to Settings, and click Printers.
- In the Printers window, highlight the appropriate HP DeskJet icon.
- From the File menu, click Properties.
- Select the Details tab.
- Click Spool Settings.
- Click the down arrow next to Spool data format.
- Change the setting from EMF to RAW.
- Click OK and click Apply. Click OK to close the Printers window. Restart Windows 95 and then try printing.
Disable the print spooler in Windows 95
This option disables the print spooler in Windows 95. The speed at which you computer can handle more than one task (multi-task) while printing will be slower than normal.
- Click Start, point to Settings, and click Printers.
- In the Printers window, highlight the appropriate HP DeskJet icon.
- From the File menu, click Properties.
- Select the Details tab.
- Click Port Settings.
- Click Spool MS-DOS (R) print jobs, and then Check port state before printing to deselect them, and click OK.
- Click Spool Settings.
- Click Print directly to the printer. The Spool data format will default to RAW.
- Click OK and click Apply. Click OK to close the Printers window.
- Restart Windows 95 and try printing.
Temporarily close the program interfering with the printer
This option temporarily closes whatever program is interfering with the printer (fax or answering machine) so that the printer can print error-free.
Restart Windows. On the keyboard, press CTRL+ALT+DELETE to open the Close Program window.
Click any fax or answering machine program listed and click End Task. Repeat this process if more than one program is listed that may interfere with the printing process.
Try printing. If the document prints properly, the program(s) that was closed was interfering with the printing process. If the error occurs and there are more programs running that might interfere with the printing process, repeat the steps above.
Update the LPT.VXD file to version 4.00.503.
NOTE: The LPT.VXD file is not located on the Windows 95 diskettes. Those with diskettes must contact Microsoft to obtain the file (LPT.VXD version 4.00.503) from Microsoft's electronic distribution center.
- In Windows Explorer, from the View menu, click Options. Select Show All Files.
- Select the C:\WINDOWS\SYSTEM folder within Windows Explorer. Highlight the LPT.VXD file, select File, and Rename. Rename the file LPT.OLD.
- Open a second window of Windows Explorer so that both are visible. Select the CD-ROM disk drive (usually D:\) and then choose the DRIVERS\PRINTER\LPT folder. Highlight the LPT.VXD file and drag it into the C:\WINDOWS\SYSTEM folder in the first Windows Explorer.
NOTE: If the Windows 95 version B (OSR2) is being used, the LPT.VXD file will be located under the DRIVERS\PRINTR\LPT folder. (Printer is abbreviated.) - Close the Windows Explorers and restart Windows 95.
Use a Different Printer Driver
- Click Start, point to Settings, and click Printers.
- Click the Add Printer icon.
- Click Next on the first screen of the Add Printer Wizard.
- Keep clicking on Next until you get to the list of Manufacturers.
- Select HP in the Manufacturers list and choose HP DeskJet 550C Printer in the Printers list, as shown below, and then click Next.
- Follow the on-screen instructions to finish installing the HP DeskJet 550C Printer. Try printing with the HP DeskJet 550C printer driver selected in the program.
Disabling Bidirectional Communication
Printing problems may occur and you may receive error messages when the HP Printing System for Windows is installed on a computer that does not have a bidirectional port or a bidirectional printer cable. Printing problems specific to bidirectional communication (two-way communication) can be fixed by upgrading your computer's hardware so that it does have a bidirectional port or a bidirectional printer cable, or by turning off the bidirectional function in your printer driver software.
If you turn off the bidirectional communication in your printer driver, the print quality will not be affected. However, some of the advanced features of the Status Monitor or HP Toolbox will be disabled:
- You will no longer receive reminders to align the print cartridges after a new print cartridge is installed.
- You will no longer receive error messages associated with the print cartridges.
- You will no longer receive error messages associated with the banner lever.
To disable Bi-Directional Communications, follow these steps,
- Click Start and then click Run.
- At the prompt run the program HPFCFG16.EXE
- Click Continue in the message window.
- Remove the X next to Print Cartridge Query and Bi-directional Communication.
- Click OK.
- Click Restart Windows.