|
|
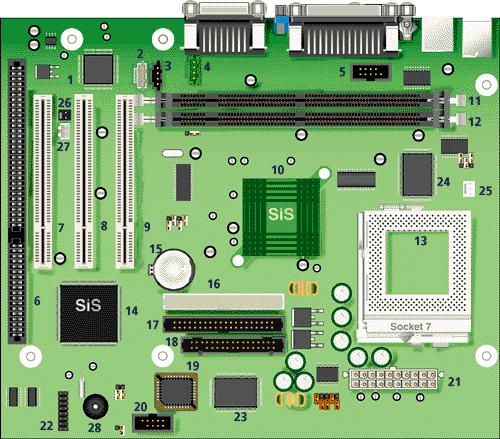
Packard Bell Miami M/Board
| Item | Description | Item | Description |
|---|
| 1 | Solo 1 ESS sound chip | 2 | Aux In |
| 3 | CD-ROM In | 4 | Modem In |
| 5 | COM2 header | 6 | ISA slot (shared) |
| 7 | PCI 3 Slot (shared) | 8 | PCI 2 slot |
| 9 | PCI 1 slot | 10 | SIS 530 |
| 11 | Bank 1 DIMM | 12 | Bank 0 DIMM |
| 13 | CPU Socket 7 | 14 | SIS 5595 PCI/ISA bridge |
| 15 | Lithium battery | 16 | Secondary IDE, up to 2 IDE devices |
| 17 | Primary IDE, up to 2 IDE devices | 18 | Floppy connector, 34 pin FDD connector |
| 19 | Flash BIOS | 20 | Front USB header |
| 21 | Main Power input | 22 | Front Panel connector |
| 23 | I/O controller | 24 | Cache |
| 25 | CPU FAN header | 26 | Ring-In |
| 27 | WOL header | | |
Specification
- Audio : ESS Solo-1.
- BIOS : AMI BIOS.
- Cache : 512KB write back direct mapped pipeline burstcache.
- Chipset : SIS 530 & 5595 chipset.
- CPU Support : Socket 7 processors: Intel Pentium P55C, Cyrix MII, AMD K6-2.
- Expansion Slots : 2 PCI slots and 1 shared ISA/PCI slot.
- Form Factor : MicroATX
- RAM : 2 DIMM sockets supporting single- or double-sided SDRAM up to a maximum of 512 MB.
- Video : Integrated in chipset.
Upgrade Options
CPU : CPU upgradable up to 450 MHz.
RAM :
- RAM upgradable up to 512 MB using 66 or 100 MHz SDRAM DIMMs.
- The Miami motherboard only accepts 168-pin DIMM modules. Only gold-plated DIMMs may be used, as the sockets on the motherboard are also gold-plated, and oxidation must be prevented.
- Use 60 ns, 3.3 V CAS Latency 2, single- or double-sided DIMMs only. Parity is not supported.
Jumpers
| Jumper | Function | Configuration |
|---|
| JP18 | CMOS/Password Clear | Open - Normal Operation
Closed - Clear CMOS Data |
Onboard VGA (JVSB1)
| Pins | Function |
|---|
| OFF | Enable onboard video |
| ON | Disable onboard video |
Front/Back USB Port Select Jumper Block (JP10)
| USB Port | JP10 Settings |
|---|
| Front | 1-2, 4-5 |
| Back | 2-3, 5-6 |
CPU/DRAM Clock Selection
CPU/DRAM Clock
(MHz) | JP5 | JP6 | JP7 | JP8 |
|---|
| 66 | OFF | ON | ON | ON |
| 75 | OFF | ON | ON | OFF |
| 83 | OFF | ON | OFF | ON |
| 90 | ON | ON | ON | ON |
| 95 | OFF | ON | OFF | OFF |
| 100 | OFF | OFF | ON | ON |
CPU/Bus Speed Ratio Select
| Intel CPU/Bus | JP2 | JP3 | JP4 |
|---|
| X1.5/X3.5 | OFF | OFF | OFF |
| X2.0/X6.0 | ON | OFF | OFF |
| X2.5 | ON | ON | OFF |
| X3.0 | OFF | ON | OFF |
| X4.0 | ON | ON | ON |
| X4.5 | ON | OFF | ON |
| X5.0 | OFF | ON | ON |
| X5.5 | OFF | OFF | ON |
CPU & I/O voltage
| Voltage | JP11 | JP12 | JP13 | JP14 | JP15 |
|---|
| 1.8v | OFF | ON | OFF | ON | ON |
| 2.1v | ON | OFF | OFF | OFF | OFF |
| AMD K6-2: 2.2v | OFF | ON | OFF | OFF | OFF |
| Intel Pentium: 2.8v | OFF | OFF | OFF | ON | OFF |
| Cyrix M2: 2.9v | ON | OFF | OFF | ON | OFF |
| 3.1v | ON | ON | OFF | ON | OFF |
| 3.2v | OFF | OFF | ON | ON | OFF |
|
|