Acer File Extensions |
Advent 6411 (ME) Laptop
Note - there are two Advent 6411 laptops. This page refers to the older Pentium III model which was supplied with Windows ME. If you have the newer Dual-Core model which was supplied with Windows Vista then go to this page.
Specification
| CPU | Intel Pentium III 1.0GHz |
| Chipset | SIS 630 |
| Memory | 128MB PC133 SODIMM (2 memory slots. Max 512MB) |
| Hard Drive | 20GB |
| CD Drive | 8X Toshiba SD-C2502 DVD-ROM |
| Floppy Drive | Floppy drive fitted |
| Screen | 14.1" TFT (Native Res.1024x768) |
| Video Card | SiS 630 8MB shared |
| Sound Card | SiS 7018 |
| Modem | SmartLink 56K - HAMR 5600 V.90 |
| Network Card | SiS 900 |
| Ports | 1x Microphone 1x Headphone 1x PC Card slot 1x IR Port 1x Kensington Lock 1x PS/2 1x Parallel 1x VGA 2x USB 1x TV Out 1x IEEE1394 (FireWire) 1x Modem/LAN |
| Battery | 87-2208S-42C (14.8v 3600mAh) |
| Made By | Gericom 2200C |
Drivers
Your laptop should have been supplied with a utility CD which contains a backup copy of all the drivers.
Memory Upgrades
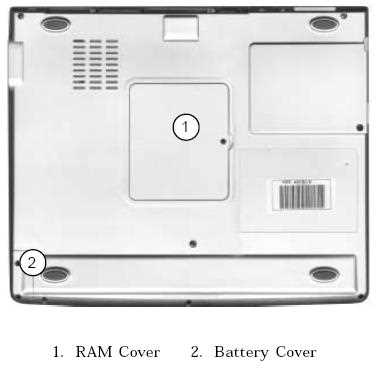
This laptop has two memory slots. To access the memory compartment -
- Make sure the computer is switched off and everything unplugged
- Turn the laptop upside down and remove the screw holding the memory compartment cover (see "Bottom of Laptop" section below)
- Removing the cover will give you access to the memory compartment which contains both memory slots.
Note - If you are using two memory modules then they both must be of the same type, according to the user manual you cannot mix PC-100 and PC-133 memory on this model.
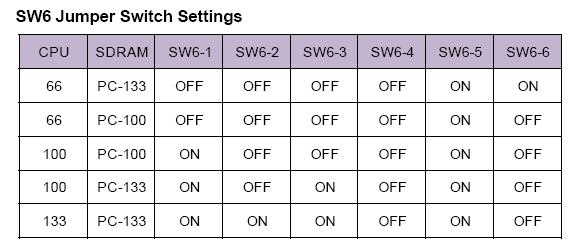
Setting the SW6 Jumper Switch
If you upgrade the memory and the new modules are different to the previous ones, ie PC-100 instead of PC-133 then you will need to change switch SW6. If the new modules are the same specification then you can skip this step.
To update the SW6 setting do the following -
- Turn off the computer
- Remove the keyboard by pressing the 4 latches at the top and gently lifting it out of the notebook
- Place the keyboard as shown
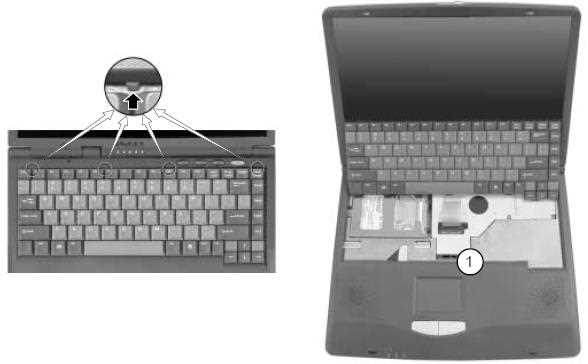
- Locate the SW6 jumper switch (marked '1' on the diagram above)
- Set the SW6 jumper as per the diagram below
- Replace the keyboard
Bottom of Laptop
Function Keys
Fn+Esc - Toggle between suspend/resume state
Fn+F3 - Expand LCD display. Only works in 640x480 resolution
Fn+F5 - Turn audio on/off
Fn+F6 - Toggle the display between LCD, CRT, and LCD+CRT
Fn+F9 - Decrease screen brightness
Fn+F10 - Increase screen brightness
In the Box
Disks Supplied
- Recovery CD
- Utility and drivers CD
Items Supplied
- Advent 6411 notebook
- Mains power adapter
- Mains power cable
- UK modem cable
- S-Video cable
Documentation Supplied
- Advent notebook user's manual
- Gettings started with Microsoft Windows Me
- Freeserve leaflet
- Fax/modem user guide
Recovery
Warning: this process will erase all files from your computer. It is important that you save any personal files to disk before you begin.
A bootable recovery CD is supplied with these machines. To recover the system:-
- Insert CD (and floppy disk if supplied) into the drive.
- Reboot the PC.
- A warning message prompting you to backup data before proceeding.
- Press Y to continue.
- A final warning that all data will be erased is displayed.
- Press Y to continue.
- Finally a message "Remove CD-ROM when prompted" is displayed.
- Press Y to continue.
- The image file will load. Once complete you will be prompted to remove the CD and press CTRL + ALT + DEL to restart.
Driver CD
The notebook is supplied with a Utility CD. This can be used to restore corrupt drivers.
When I go to use the recovery disks, it asks for a password.
The password is - servicecall
However, in certain circumstances it may not be possible to type the complete password into the Ghost interface. This is because of a limitation of the Ghost software used on a few isolated models. If this issue occurs Ghost should be run from the command line with the following command :
Ghost -pwd=servicecall
The recovery procedure should now run through correctly.
FAQ
Blank screen or EMM386 error after recovery
Once the recovery has completed the screen goes blank or an EMM386 error message is dispalayed. This happens because the laptop is having problems displaying the message to remove the CD and restart. Simply remove the CD from the drive and restart the laptop, first time setup will begin as normal.
How to Access the CMOS Battery
Replacing the CMOS battery on this model is a bit of a challenge as it involves removing both the keyboard and the processor heatsink -
- Firstly remove the keyboard (see the "Memory Upgrade" section above for instructions)
- Once the keyboard has been safely removed the heatsink and fan should be visible
- Remove the 4 screws holding the heatsink, note these have springs incorporated to keep the heatsink firmly attached to the processor
- Next carefully lift out the fan and heatsink, the fan has a power lead which will need unplugging with a gentle pull
- You should now be able to see the CMOS battery holder, move the brass catch to the right to release the battery. Note the battery holder may be covered with a round piece of plastic that you will need to peel off first
- Fit a new 3v battery and then reverse the above steps to reassemble the case