Acer File Extensions |
Advent 6522 Laptop
Specification
| CPU | Intel Celeron 1.3GHz |
| BIOS | AMIBIOS. Press DEL to enter |
| Chipset | SIS 630 |
| Memory | 512MB PC133 SODIMM (2 memory slots. Max 1GB) |
| Hard Drive | 30GB Toshiba MK3017GAP |
| CD Drive | Matshita UJDA 710 Combo drive |
| Floppy Drive | Floppy disk drive fitted |
| Screen | 15" TFT (Native Res.1024x768) |
| Video Card | SiS 630/730 (up to 64MB shared) |
| Sound Card | SiS 7018 |
| Modem | SmartLink 56K |
| Network Card | SiS 900 |
| PC Card | 1x Type I/II/III |
| Ports | 1x IR 1x Kensington Lock 1x USB 1x Modem 1x PS/2 1x Microphone 1x Headphone 1x S-Video (TV-Out) 1x VGA 1x Serial 1x Parallel 1x LAN |
| Dimensions | 39.5 x 315 x 256 (HxWxD in mm) |
| Weight | 3kg |
| Made By | Gericom Webgine (N340S8) |
Drivers
Your laptop should have been supplied with a utility CD which contains a backup copy of all the drivers.
Memory Upgrades
- Remove the keyboard by releasing the 3 retractable clips at the front of the keyboard with a small screwdriver (clips are below the 'Fn', 'Alt Gr', and 'Down Arrow' keys).
- Lift the keyboard clear of the notebook, there is a ribbon cable attached to the keyboard so take care.
- Now lift the metal keyboard protector from the case.
- Next remove the metal cover in the middle of the case (held in by two screws).
- You now have access to the 2 memory slots.
Bottom of Laptop
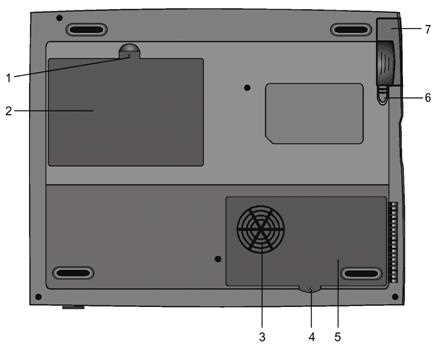
1. Fixing screw
2. Hard drive bay
3. CPU heatsink / fan grill
4. Fixing screw
5. CPU heatsink cover
6. Battery latches
7. Battery pack
Function Keys
FN + F1 - Hibernate
FN + F3 - Battery Low Warning Beep on/off
FN + F4 - Toggle the display between LCD, CRT, LCD+CRT
FN + F5 - Increase volume
FN + F6 - Decrease volume
FN + F7 - Increase brightness
FN + F8 - Decrease brightness
FN + Num Lock - Activate Numeric Keypad
Note - The Fn + F9/F10 contrast control keys don't work on the 6522 as it has a TFT display. These keys are only designed to work on older models using Dual Scan DSTN screens.
In the Box
Disks Supplied
- Advent 6522 recovery CD
- Notebook utility CD
- Nero burning ROM CD, OEM
- PowerDVD CD
Items Supplied
- Advent 6522 notebook
- Mains power adapter
- Mains power cable
- UK modem cable
- BT connector
Documentation Supplied
- User manual
- Advent installation and troubleshooting guide
- "Windows XP start here" guide
Recovery
Warning: this process will erase all files from your computer. It is important that you save any personal files to disk before you begin.
A Bootable Recovery CD is supplied with these machines. To recover the system:-
- Insert CD into the drive.
- Reboot the PC.
- A warning message prompting you to backup data before proceeding.
- Press Y to continue.
- A final warning that all data will be erased is displayed.
- Press Y to continue.
- Finally a message "Remove CD-ROM when prompted" is displayed.
- Press Y to continue.
- The image file will load. Once complete you will be prompted to remove the CD and press CTR + ALT + DEL to restart.
Driver CD
The notebook is supplied with a Utility CD. This can be used to restore corrupt drivers. The folders on the CD contain the following -
- Driver: Drivers for all the hardware.
- Manual: This folder contains individual PDF files for each chapter
- Utility: Flash BIOS Utilities, HDPrepare, QKey
FAQ
Replacing the CMOS Battery
To get to the CMOS battery you need to remove the CPU heatsink cover underneath the laptop. The battery is a coin sized CR2025. If you have problems reaching the battery then you'll need to take out the CPU heatsink, to do this remove the 4 screws holding it in and lift out carefully.
Repairing a Broken Charger Socket
Kyle Millican has put together a guide for repairing a broken charger socket on this laptop. The guide is in PDF format and can be downloaded from here - Kyle Millican’s - Advent Laptop Charger Socket Repair Guide (2MB)